Lesson 4 - A Second Room and a Simple Door
Note: This tutorial was written for Quake2 mappers. I have also created a
Quake version
and a
Hexen2 version of this same tutorial. Read that if you are doing maps for either of those
games. The content is the same; it's just the texture/entities/screenshots that have
changed.
Now that you're getting the hang of
things, I may not be quite so detailed in future lessons. If I need to
go into more detail on something,
E-mail
me and let me know. In earlier lessons, we've been creating a test
map. If you did those lessons, you should have a file called
'Lesson3.map'. If you don't have it you can download it
here.
Before we change anything, make a copy of
Lesson3.map and call it Lesson4.map. Now load Lesson4.map into BSP and
let's get underway.
We've got this first room pretty well set up, so
let's attach a second room now and put a door in between.
Since this is just a simple map, let's keep the second room simple,
but let's make it bigger than the first one. That way we can put some
other things in it later :-)
Draw a new brush from (-912, 256) to (-272, -320).
Switch to a side view and drag the floor to 0 and the ceiling to 256.
If you don't understand what I'm talking about here, review earlier
lessons to find out how to accomplish this. For the benefit of those
who have worked through earlier lessons, I'll be a little more brief
in some of my descriptions. If you feel there needs to be more
explanation, let me know.
With the new brush still selected, give it a
texture. I chose "DAMAGE1_1', but if you want to use something else, feel
free. Let me digress a bit here about textures. The texture I've
chosen is 128x128, but the ceiling in this room is 256 high. We could
go ahead and use the texture this way, but it might look kind of odd
repeating twice as it goes up the wall. Fortunately, in BSP, there's a
way to make the texture fit the wall a little better.
Hit the 'S' key and you will see the Surface Window
pop up. Here, you'll see a row of numbers and buttons across the top. A
later lesson will go more into detail on textures, but for now, look
at the '+' and '-' buttons next to the 'Sy' label. Click the '+'
button until the number under 'Sy' reads 2.0. Now click 'Apply Brush'
to apply the texture to the brush (or hit Alt-B like you always do).
If you look at the texture preview 3-D mode now,
you'll see that the texture we applied has been stretched vertically
to fit the wall. I know, with this particular texture, it probably
doesn't look that great, but you can see the results. As you might
have guessed, the 'Sx' buttons stretch the texture horizontally, just
like the 'Sy' does in the vertical dimension. Cool, eh?
After applying the texture, switch back to a side
view. Make sure the grid size is set to 8, select 'Room' from the drop-down
list on the tool bar and click on the 'Make' button.
Remember, depending on your BSP setup, you may see a
dialog box asking for wall width here. If you do, make sure the
thickness is set to 8. Deselect the brushes that make up your new room
and select the ceiling brush.
Let's apply 'WTROOF4_6' texture to the
ceiling, but before you actually apply the texture, we need to clear
out the 2.0 setting we put in earlier. Go back to the Surface Window
and click the 'Reset' button to clear out any old settings. You can
also right-click on the texture window and select 'Reset'. Either way
works fine, just remember to do it, or later brushes will have settings
you don't want. In this case, we don't want the ceiling texture to be
stretched so we need to clear it.
Go ahead and apply 'FLOOR3_3' to the floor brush
to make it consistent with the first room. (Remember to clear the
stretch settings here also if they need it). Now, we've got our
second room, but we need to make a doorway in order to allow access
from the first room. Anybody care to guess how we're going to do that?
That's right, brush subtraction.
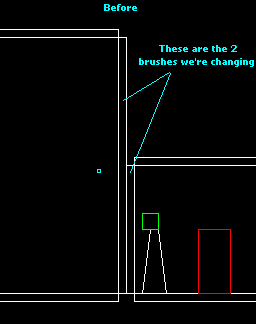
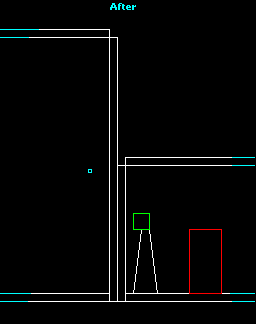
Before we do that, however, switch to the front
view and select the two wall brushes that are between our two rooms.
Since the two brushes are different sizes, you can only select and
size one at a time, but drag the bottom edge of each brush down 8
units. Here's a before and after shot:
The reason we're doing this is so that when we cut
our door through these two walls, a small amount will be left below
the door. This will make the floor flow continuously between rooms and
prevent leaks which can make a
map unplayable. Sometimes, depending on the location and size of the
leak, the player can fall through the map and float away into the
void. A neat effect, but it makes playing the map pretty tough.
Now we're going to cut the opening for our door.
Switch to the Top view and drag a new brush from (-288, 64) to (-240,
-64). Switch to a side view and drag the bottom of your new brush to 0
and the ceiling to 128. Once you've gotten the brush sized correctly,
subtract it from the map and delete it. That will leave an opening
between the two rooms.
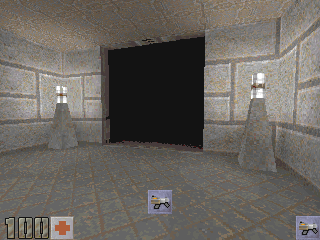
Here's our map at this point. You'll notice a
couple of things right away. Number one, the room beyond the door is
pitch black. That's because we haven't added any lights yet. Remember
in Quake2 once you add one light, you're completely in control of
lighting from then on. The second thing to notice is that the area
around the inside of the door looks weird. This is because the
textures we applied to the walls are showing here also. Both of these
problems are easily fixed. Let's address the texture problem first.
BSP allows you to set the texture for a single face
of a given brush, as opposed to setting the entire brush. Let's do
this to the brushes which surround the door. Let's start with the 2
brushes in the floor. Select each of these brushes (remember how we
used
hit brushes in lesson 2 to
select the brush we want?) and apply the 'FLOOR3_3' texture to each. It
is alright to apply this texture to the whole brush in this case,
since we can only see one side. Switch to the 3-D texture preview and
you should see that the floor texture flows smoothly from one room to
the next now.
Now select the brush above our doorway and switch
to the Front or Side view. Notice that one side of the brush is
yellow? That's the side that's selected, which means that it is the
side we can apply a texture to. Click outside the brush with your
mouse and whichever side of the brush you happen to be on, that is the
side that becomes selected. Try it out to see what I mean, but when
you are done, make sure the bottom of this brush is selected.
Now, with the bottom of this brush selected, let's
apply 'C_MET8_2' to the bottom face of this brush. With the bottom
face selected, hit ALT-F (or click on 'Apply Face' in the Surface Window).
This applies the texture to only the
selected face, rather than the entire brush. How's that for easy?
One more thing before we go to the next brush. With
the brush above the doorway still selected, switch to the Front view.
Notice how there is a space of 8 units next to this brush, between
this brush and the ceiling brush of our first room? This will create a
gap in the ceiling of our map and make an ugly grey space appear here.
So, to fix it, simply drag the right-hand side of the brush over,
making this brush 16 units wide and filling the gap. This will plug the leak
and allow our map to compile correctly.
We still need to fix the brushes on each side of
our door, to make the textures blend together, so one at a time,
select each of the two brushes on either side of the doorway opening
and apply the 'WTROOF4_6' texture to the face of the brush which
borders on the doorway. When you are finished, you should be able to
switch to the 3-D textured preview and check your work. Now the facing
on the inside of the doorway should be all one texture. (You can also
change these textures directly in the 3D window - see
this tutorial for details on 3D texture
manipulation)
Got it? Okay, now if you remember, we still need to
add lights to our room. I'll go through this pretty quickly, since
you're all familiar with making lights now. What I did in this map is
to make a brush from (-304, -288) to (-272, -320), set it to be 128
units tall, sitting on the floor. Then I clipped it from (-304, -320)
to (-272, -288). I textured the brush with 'C_MET5_1' then changed the
diagonal face which faces out into the room to a texture of
'BASLT3_1'.
Depending on whether or not you are using my grid coordinates in your map, you
may need to offset the texture on the diagonal face
16 units in the x-axis. In the Surface Window, you'll notice a
'+' and '-' button next to the letter 'S'. Clicking these buttons up
and down sets the X-Offset that will take effect on the texture you
are applying. In this case, click the '+' button until the counter
reads 16. This will offset the texture 16 units. The 'T' buttons next
to these control the Y-axis texture offset. Of course you need to do
this before you actually apply the texture. Remember to click 'Reset'
to clear any previous settings which may still be
hanging around. (There are lots of buttons/checkboxes in the Surface window. I'll
devote a later lesson to these when I get them all figured out ;)
This texture alignment method is kind of
cumbersome, so let me show you another way. In BSP, you can align
textures interactively in the 3-D window. Position your camera so you
are looking at the face of the brush you want to align. Make sure that
this face is the currently-selected face and turn on the texture
preview mode. Now, you can move the texture up, down and sideways by
Shift-dragging on the brush. The offset values are displayed in the
status bar as you drag. Ctrl-dragging adjusts the scale values of the
texture and Ctrl-Shift-dragging adjusts the texture Rotation value.
This is a very handy feature.
Once this light fixture is prepared, copy it and
paste it back into your map. Now with the pasted brush still selected,
click on the 'Rotate Selected 90 degrees on Z axis' button and drag it
until it sits in the lower left hand corner of this second room.

Rotate on Z button
Now do the same two more times, rotating the brush
on the z-axis and make light fixtures for each of the other corners in
the room. Of course these are only light fixtures, they don't emit
light yet. The BASLT3_1 texture doesn't give off light, in spite of being
a light texture. We can fix that easily enough though. Remember how we
made out sky give of light in lesson 3? Select one of the new light posts and make
sure the diagonal face is the current face. Then in the Surface window, click the
box for 'light' and set a value of 10000. When these are set, click on 'Apply Face'
to set the values on the brush. Now, do this for each of the other lightposts
that we just added, remembering to apply this 'light' attribute to only the diagonal face.
If you have trouble applying just the 'light' attribute (the texure from some other part of the brush
appears when you do it for instance), then try selecting the brush by clicking directly on that face in
the 3D window. This will update the Surface Window with the proper texture for just
that face.
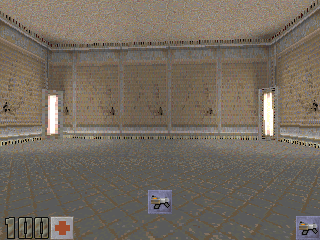
Here's what your new light fixtures should look
like in Quake2:
Now, let's make that door like I promised earlier.
In Quake2, there are several different types of doors available. In
this lesson, I'll show how to make a simple door that opens when you
approach it and closes after you go through. In later lessons, we'll
get into button-controlled doors, secret doors, and more advanced door
design.
First of all, we need to make 2 brushes to
represent each side of our door. Make sure no brushes are selected and
draw a new brush from (-268, 64) to (-260,0). You may need to set your
grid size to 4 in order to do this. Switch to a side view and drag the
bottom of your brush to 0 and the top to 128. Now apply the 'GRNMT1_1'
texture to this brush. (Offset the texture 64 on the X axis to make it
look a little better if you want)
Before we turn it into a door entity, let's go
ahead and make a copy of this brush and drag it into position as the
other half of our door, so that the two brushes fill the doorway.
Now with the newly pasted half of the door still
selected (you may have to deselect it and reselect it to make these
following changes take effect), switch to the entity window and make
this brush into a 'func_door' entity. While you are in the entity
window, set the angle to 270 and assign a 'sounds' '2' key/value pair
to your new door. Switch back to your top view and select the other
half of the door (the one you drew first) and make it a 'func_door',
with an angle of 90 and 'sounds' '2' key/value pair.
If you look at the top view now, you'll see your
two brushes have arrows in them, indicating the direction they will
travel. That's a neat feature to make sure you've got everything lined
up before actually play-testing your level. Well, believe it or not,
that's all there is to making a door. You can control other features
of your door, like its speed and how much of a lip it leaves showing
when it's opened, but for now, the default settings are fine.
Save your map and try it out. Look at your new
light fixtures too and see how they look while you're at it. I know
some people might not like the textures I've chosen, but hey, I'm
not an artist. :-) The main point of this lesson was to show
how to make a door, not to prove my worth or unworth at artistic
endeavors.
Well, that wraps up this lesson. Hope you got
something useful from it. See you soon.
This site is designed for 800x600 resolution, and is best
viewed in Netscape 4.0 or above with 16bit color or higher.
BSP is the sole creation of
Yahn Bernier. I am only a
dedicated user, reporting news and making tutorials so Yahn can spend more
time enhancing BSP.
This web page was created and is being
maintained by me (DeadMeat). Unless otherwise noted, all content appearing on this site
was written by me. Also, 'DeadMeat's BSP Tutorials' were created entirely by me. All unauthorized use is
prohibited. (c) 1997. So there :-P