Lesson 6 - Groups
We're not
actually going to draw anything in this lesson, but I'll show you how
you can speed up working with BSP by using the Group Window.
You'll notice as your maps grow larger that it
becomes increasingly difficult to select particular brushes to work
with. Also, 3-D rendering becomes slower the more brushes you have in
your map. In small maps you'll hardly notice any slow down, but the
lag seems to grow exponentially as your map grows. This isn't the
fault of BSP; it just takes longer to draw all those brushes. We need
a way to hide brushes in areas of the map we aren't working in. That
way, we can concentrate on a specific area without having to suffer
the overhead of all those other brushes. Fortunately, BSP provides a
convenient way to do just that: Grouping.
In BSP, you can select groups of brushes and make
them invisible to the editor. This can speed things up by not having
to re-draw all those brushes all the time. If that were all you could
do with groups, that would be great, but there's more. You can copy
and move entire groups as one. You can export and import groups
between maps. The usefulness of groups is enormous. And you get all
this power without much work on your part. (That's the really great
part).
So what do you say we get started. Load up a map
(any map, it doesn't matter). Now, pick a part of your map that you aren't
currently working on, like a room that you are finished with or something. Select
all the brushes that make up this area. Since
you're essentially done with this area, those brushes just get in the way
when we're trying to work on other areas of our map. Let's make them into a
group and turn them invisible.
It's probably going to be easiest to select these
brushes in the 3-D wireframe view, so switch over there and move your
camera position around so you can select all the brushes you want to group
together. Remember that in the 3D view, you can select objects by
just clicking on them. Once you've got a few brushes selected,
switch over to the Group window.
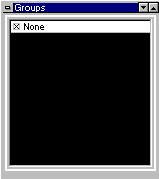
Right-click on 'None' and the following menu will
pop up:
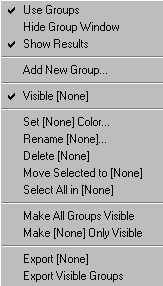
Select 'Add new group...' from this menu. A box
will pop up and ask you for a name. Type some meaningful name for the brushes
you are grouping together (without quotes) and click on OK. A color dialog box will pop-up. Pick
a color you want to use for this group and click OK again. Voila! You've
just created a brush group. Your new group appears in the list of
groups in the Group Window. If you look in the editing windows, you
should see the brushes in your group have changed to whatever color
you selected for this group. This lets you know they are grouped.
Cool, eh?
Now, in the Group window, make sure your new group is
selected in the group list and right-click on the Group Window again. This time select
'Visible'. Now your group has disappeared from view.
Relax, it's still there, you just can't see it. (Re-select 'Visible'
on the context menu if you don't believe me). These brushes will not
show up in any of the view windows now, including the 3-D textured
preview (this is where the speed savings really shows up)
Of course, you can turn off multiple groups if you
want. Personally, I like to turn off all the groups except the ones
immediately surrounding whatever area I am currently working on. That
way I can focus just on that one area.
That's all you need to know to use groups, but you
might be wondering what some of the other options on the context menu
do. Well, here's what I know about them:
- Set Color - You can change the color for a given
group by clicking here after the group has been created. One note
about colors, if you're using 256 color mode, some of these colors
may not appear quite right in the view window. In HiColor or
TrueColor modes, they really stand out.
- Rename - Allows you to change the name of the
currently selected group. A dialog box will pop-up asking for the
new name.
- Delete - Deletes the group association for a
group of brushes. This does not delete the brushes themselves; they
are simply ungrouped now.
- Move Selected To - This allows you to add
brushes to a group after it's created. Select the brushes you want
to add, select the group to add them to and click this button.
- Select All In- Makes all the brushes in the
current group 'selected'. This allows you to move or copy them as a
group.
- Make All Groups Visible - Makes all groups
visible (duh) - Handy if you have several groups turned off and want
to see them all.
- Make Only Visible - Turns off all groups except
the one you have selected. This is nice for quickly turning off all
other groups but the one you are working on.
- Export - Copy the current group to a separate
file. You can use this to make a library of brush groups if you
want. That way if you design something really cool, you can use it
in several different maps without having to recreate it.
- Export Visible Groups - Copies all the visible
brushes to a new file.
The name of the current group shows up in each
command, so you know what group you are working with. In the above
screenshot, it's [None].
Now, there are a few things you'll need to know to make
grouping work well for you:
First, when you draw a new brush, it will be assigned to
whatever group is currently selected. This is handy, but if you're not
careful it's easy to draw a brush in a group you weren't expecting.
That is one reason for the 'Move Selected To' option - so you can
change a brush to another group after it's been drawn.
Next, whenever you copy a brush, the pasted copy get's
assigned to the current group, regardless of whatever group the
original copied brush belonged to.
And finally, when you load a map, all groups are set to the
visibility status they had when you saved it.
Go ahead and play around with the grouping window
to get comfortable with it. You can make as many or as few
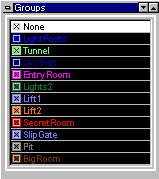
groups as you want. Just remember that on larger maps it really comes
in handy to be able to hide a bunch of these. Here are the groups I
used for a map I did for another lesson:
Well, that's it for this lesson. Hope you find
groups as easy and useful as I have. Next time I'll go over a few more
triggers, including the exit trigger as we make an exit from our map.
See you soon.
This site is designed for 800x600 resolution, and is best
viewed in Netscape 4.0 or above with 16bit color or higher.
BSP is the sole creation of
Yahn Bernier. I am only a
dedicated user, reporting news and making tutorials so Yahn can spend more
time enhancing BSP.
This web page was created and is being
maintained by me (DeadMeat). Unless otherwise noted, all content appearing on this site
was written by me. Also, 'DeadMeat's BSP Tutorials' were created entirely by me. All unauthorized use is
prohibited. (c) 1997. So there :-P