Quake - Lesson 7 - Advanced Lighting Techniques
Note: if you've never used BSP before, I suggest
that you review some of my
General BSP tutorials to get a feel for using the
editor. These tutorials for Quake-specific items will be geared to people who are already comfortable
with BSP.
Hi again everybody! Glad you came back. In this
lesson, I thought we would learn a couple of neat lighting tricks. If
you've ever played E1M5 of Quake, you might have noticed the shadow of
a Quake symbol on the ground but there is nothing visible to cast the
shadow. This is called 'sourceless shadowing' and is a really cool
trick we'll learn in this lesson. Also, we'll learn how to make a
spotlight.
Before we get started, we'll need a room to play
around with, so I have one available
here.
It's the same room we used in the last lesson, but I removed all the
prefabs we made. Load this level into BSP and we'll get started.
Okay, for sourceless shadowing to work, you have to
use the sky brush. One trick of Quake is that light shines through sky
brushes as if they aren't there, but the player can't see through
them. This is really useful. In the map you just loaded, select the
ceiling brush and give it a sky texture.
Now, if we put a light above this 'ceiling', we
could make our shadow, but since the Light entity would be outside the
map, QBSP would generate a leak. In order to get around this, we need
to make a 'false' ceiling, lower than the original ceiling, so copy
your sky brush and move the copy down to 128 on the Z axis.
Once you've got your false ceiling positioned,
let's make a shape to cast a shadow. As a bonus in this lesson, I'll
show you a method for making a Quake symbol. The brush count is kind
of high for this shape, so you won't want to use it in a very large
room, but it looks fairly decent. We'll start by making a brush
128x128 in the Top View. Give this any texture you want as long as
it's not a liquid texture or sky texture. We won't see this brush, so
the texture we use doesn't matter. Switch to a side view and position
the bottom of this brush at 140 on the Z axis and make the brush 8
units tall.
Now, click on the cylinder button (remember we used
that in the last lesson?) and enter the following information - Sides:
12, Strips: 1, Inner Radius: 4, Outer Radius: 64. Click OK and you
will see a cylinder appear in place of the brush you drew. (If you
want to lower your brush count, you could make these N-sided brushes
instead of cylinders - just thought you might want to know.) All the
brushes which make up this cylinder are selected, so copy them and
paste a new copy. Manuever this copy so that it lies in the same place
as the original, then with the pasted copies still selected, click on
the Scale button. Scale these brushes .85 in the X dimension and .85
in the Y dimension. Once you've done this, switch to the Top View (if
you're not already there) and drag these brushes 16 units towards the
top of the screen.
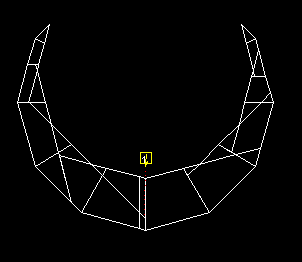
Click on the subtract button. It may take a few
seconds to do this, since you're subtracting a lot of brushes here.
When it's finished, click on the trashcan button to delete the
subtracted brushes. If there are any stray brushes left over (where
the center of your subtracted brushes were for instance) delete them
also. You should see something like this:
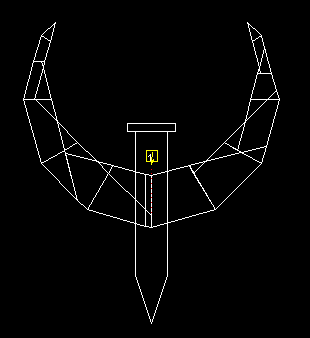
That's the hard part of making the Quake symbol.
For the rest, simply make a brush from (-136, -56) to (-120, -152).
Make it 8 units tall and set the bottom of the brush on 140, just like
the cylinder you drew earlier. Now clip this brush from (-128, -152)
to (-136, -128) and from (-120, -128) to (-128, -152). Make another
brush from (-140, -52) to (-116, -56), also 8 units tall in the same
vertical position as the others. At this point, your screen should
resemble this:
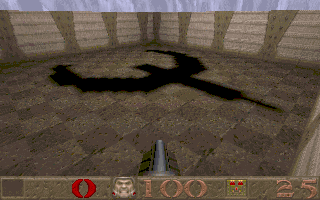
Okay, that should provide us with something that
will cast a shadow. Now all we need to do is add a light source and
we're done. Make a light and center it directly over the Quake symbol
and drag it up until it sits against the upper ceiling. I gave my
light a value of 500. That way it provides a nice contrasting shadow
in Quake. One thing to note here: the higher up you put your light
source, the smaller the shadow it casts will be, but it won't be quite
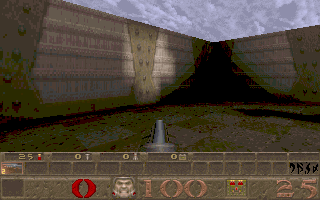
as sharp around the edges. Now, compile your map and run it in Quake.
You should see something like the following screenshot. I used the
'fly' cheat code so I could get a better viewing angle in this
picture.
Pretty cool, huh? This technique could be useful
for more than just decoration. For instance, you could hide a secret
door in the floor and make the shadow of an 'X' where the door is.
Kind of an 'X marks the spot' thing. Just an idea.
Okay, now that we can make shadows, let's learn how
to make a spotlight. This is really pretty simple, and you can use
these to provide interesting lighting effects. Again, like the
shadows, they could be used to highlight a secret door, or just for
decoration. So, what do you say we get started?
Returning to your map, let's start out by making
our original light a little dimmer. That way we can see our spotlight
easier. Select the light entity that is above your Quake symbol and
switch over to the Entity window. In the central box, select the
key/value pair that reads 'light' '500'. These values will appear in
the two boxes at the bottom of the screen. Change the 500 to 400 and
click the '+' button to make the change take effect.
Now we're ready to make our spotlight. Start out by
making a light entity, centered at (-44, 100) in the Top view. In a
side view, move it up so that it is about halfway between the floor
and the false ceiling we made earlier. Give this entity a light value
of 300. Now draw a new brush and make it into an 'info_null' entity.
This will be the target of our spotlight. Drag this brush so that it
sits against the northern wall (in the Top View) directly north of the
Light entity we drew earlier. In the side view, drag this 'info_null'
entity up so that it is on the same vertical level as the Light.
Okay, now to make the spotlight work, select the
Light entity and then CTRL-CLICK on the 'info_null' entity. This
connects them together by assigning a Target/Targetname pair to each
one. That's all there is to it. Run your level in Quake and you should
see a bright spot of light on the wall. Pretty neat! If you did yours
like mine, it should look something like this:
Remember that these two entities are linked.
Wherever you put the 'info_null' entity, the spotlight will shine on
that location. See, I told you it was easy!
Before we wrap this lesson up, there's something
else you need to know about lighting. When compiling your level Light
may bomb out if you have too many light styles on a given brush face.
Each type of light you make (flicker, flourescent, spotlight, etc)
counts as a light style. I'm not sure what the limit is, but if you
get an error message complaining about 'Too many light styles on a
face' this is the cause. Go into your map and remove some of the light
styles - in other words, change some of the flickering lights to
normal lights - and the problem should go away. The real trick is
finding out where the error actually is in your map, since you don't
get a coordinate with the error message. As a general rule, it's wise
not to use too many flickering lights anyway, since flickering lights
slow down your map, especially in deathmatch.
This site is designed for 800x600 resolution, and is best
viewed in Netscape 4.0 or above with 16bit color or higher.
BSP is the sole creation of
Yahn Bernier. I am only a
dedicated user, reporting news and making tutorials so Yahn can spend more
time enhancing BSP.
This web page was created and is being
maintained by me (DeadMeat). Unless otherwise noted, all content appearing on this site
was written by me. Also, 'DeadMeat's BSP Tutorials' were created entirely by me. All unauthorized use is
prohibited. (c) 1997. So there :-P