Quake - Lesson 2 - Platforms and Lifts
One of the neat things about Quake is that it's a
true 3D game; you can jump up on things, you can have rooms on top of
rooms, you can make bridges that cross over other bridges, etc. Doom
was only a psuedo-3D game; you could simulate some (but certainly not
all) of these things, but they never had that full 3D feeling.
So, since we're playing a 3D game, let's expand our
mapping skills by allowing the player to move in the third dimension. In this
lesson, we'll discover how to use moving platforms to create a lift.
You'll need a map file to have someplace to put your
lifts. If you worked through all the BSP General lessons, you
can you use the map we made there. If you don't have that file, or if
you've played around with yours so it doesn't match mine, you can
download
this file and use it.
Alright, let's make a lift. First thing to
understand about lifts is that you must draw them as they will look
extended vertically, but Quake will start them out in the lowered
position. You have to draw them that way so that they will be lit
properly when Light runs. Keeping that in mind, let's draw a new 64x64
brush, 8 units tall. Center this brush on (-480, 224) in the Top View
and raise it up so that the bottom of this brush sits on 128 in the Z
axis. Let's apply the texture 'PLAT_TOP2' to this brush.
This brush will make the actual platform the player
will ride. Now, if you wanted, we could turn this into a lift entity
and our lift would work, but the platform would not have any visible
support structure. That's okay, but it looks kind of unrealistic
(yeah, like Quake is realistic to begin with), but I digress. To
correct this, let's make a platform stem for our lift to sit on. Draw
a new 16x16 brush (also centered on (-480, 224) in the Top View) which
extends from the floor up to 128 on the Z axis. This will make it butt
up against the bottom of our platform. Go ahead and give it the
'PLAT_STEM' texture.
Now we're ready to make our actual lift entity.
Select both the platform and stem brushes. You may need to go to the
3D wireframe view to get them both selected at the same time. With
both brushes selected, switch over to the Entity Window and make a
'func_plat' entity. By selecting both brushes at once, this will
connect the two brushes together and make them operate as one unit. We
could have selected each one individually, but then there might be
times when only the stem moves or other times when only the platform
moves; neither effect is desirable.
While you're in the entity window, we also want to
assign 2 key/value pairs to this entity. The first one is 'height'
'128'. This tells Quake that the lift will extend 128 units in the
vertical direction. From the way we are drawing it, when Quake runs,
it will start the lift out at floor level, which is what we want. The
second key/value pair we want to add is 'sounds' '1', which will give
our lift an electronic elevator-type sound.
Now these two brushes will move together when
triggered and it will appear that the stem is rising out of the floor
to lift the platform into the air. A little more realistic than just
having a floating platform, don't you think? Believe it or not, that's
all there is to making a lift. Save your map as 'Lesson6.map'. Compile
it and run it in Quake to check it out. If you've done everything
right, you should have a functioning lift that rises when you step on
it, then lowers back to the ground when you step off.
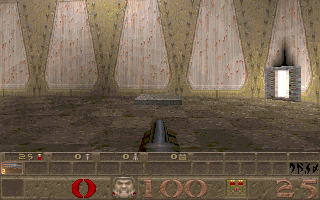
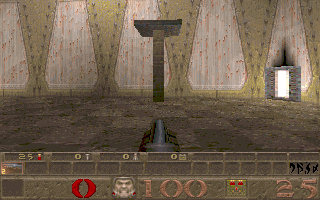
Here is our lift, lowered on the left, and in it's
raised position on the right (your map may not have the light in the corner ;-):


That's all there is to making a basic
lift. Easy, eh? However, there may be times when you want a
lift to start in the raised position and lower the player to a lower
level. The 'func_plat' entity won't work for this, so I'll demonstrate
it next.
Let's draw a new lift, in the raised position on
the opposite side of the room from our first lift. Draw a 64x64 brush
in the Top View, centered on (-480, -288). Make it 8 units high and
set the bottom of the brush at 128 on the Z axis. Give this the
'PLAT_TOP2' texture. Now let's make a stem like we did on the other
lift, but let's make it wider. Make a 48x48 brush in the Top View,
also centered on (-480, -288). Give this one the 'PLAT_STEM' texture.
Set the bottom of this brush on the floor and stretch the top up to
128 on the Z axis, just like we did in the last lesson.
Select both brushes and this time, instead of
making the brushes a 'func_plat' entity, we need to make them a
'func_door'. That way they won't start in the lowered position like
our other lift does. Remember to select both brushes at the same time
so they will function together as one unit. After you click on the
'Make Entity' button, select the 'Dn' button in the angle selection
area. This will make our lift move down when triggered. You might also
want to add a 'sounds' '1' key/value pair to your lift to give it a
sound effect when it moves.
One interesting thing to note here. If you run your
map in Quake now, when you approach the new lift, it lowers, since
Quake thinks it's a door and is 'opening' it. But if you stand on the
lift, it never raises. Again, this is because Quake thinks it is a
door. Doors don't close when you're standing in front of them. For
this reason, we need to make a trigger to make our lift work the way
we want. Let's add a button on the wall to make the lift lower to the
floor.
Go to the Front View and draw a 32x32 brush
centered on (-416, 32). Switch to the Side View and make this brush 8
units wide and drag it so that it sits against the wall next to our
new lift. Switch over to the Texture Window and select '+1BASEBTN' for
a texture. (You may not see this texture depending on whether or not
you have animation enabled. Just select 'BASEBTN' if you see that
instead.) Apply that texture to the entire brush. Now, since this
button doesn't line up exactly on a 64x64 grid, we'll need to offset
the X and Y textures each 16 units for the side of the button the
player will see. With the same texture selected, set the X and Y
offsets to 16 and apply the texture only to the side of the brush
which faces out into the room. Remember how to do that?
Click here if you forgot. You can
check your work in the 3D textured window to see if it lines up
properly. We could have offset the textures for the entire brush, but
then the sides of the button would look funny. Try it if you want to
see what I mean.
With your button still selected, switch to the
Entity Window and make this brush into a 'func_button' entity. We also
need to set the angle of our button, so Quake knows which way to move
it when it is triggered. Select 270 for the angle. That will make it
recess into the wall. Now apply a key/value pair of 'target' 'lift1' to
this entity. Remember you can call the trigger whatever you want.
That finishes the button; now all we need to do is
connect it to our lift. Select both brushes of the lift together and
assign a key/value pair of 'targetname' 'lift1' to them. This will
connect them with our button. Now the lift shouldn't operate unless
the button is pressed. That gives us complete control over when it
lowers.
Go ahead and compile your map and try it out.
Notice how the button light changes colors when you press it and then
changes back to red after a few seconds. Quake takes care of this
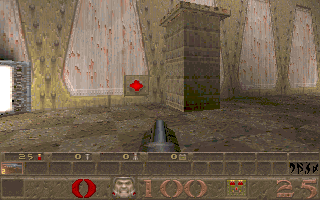
automatically for you. Here's our new lift, complete with button:

There are some other properties you can control on
the button if you want. You can control quite a bit about the button,
including how much of a lip it leaves sticking out from the wall, how
long it stays recessed and so forth. Remember, you can check out these
properties by clicking the '?' in the Entity Window. One interesting
flag you can set is the 'health' flag. If you assign a key/value pair
of 'health' '1' to your button, then the button has to be shot in
order to be triggered. Go ahead and do that now. Then when you run
your level in Quake, you can't activate the button by pressing it
anymore. Cool, eh?
Of course, when the player sees a button like this,
he's going to try to press it. When nothing happens, he is liable to
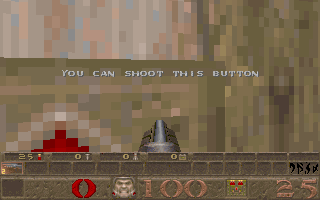
get frustrated. We can fix that. Let's have a message pop up telling
him to shoot the button. It's pretty easy to do. First draw a brush
from (-440, -296) to (-392, -312). Make it 64 units tall and make sure
the bottom of the brush sits against the floor. Now switch over to the
Entity Window and make this brush into a 'trigger_multiple' entity. Go
ahead and add a key/value pair of 'message' 'You can shoot this
button' and another key/value pair which reads 'sounds' '1'. Now, save
your map and run it again. This time when you approach the button, you
should see a message like this:

The 'trigger_multiple' insures that the message
will appear every time the player approaches. (In case he forgets and
tries to press the button later).
Well, that's it for this lesson. Hope you enjoyed it!
This site is designed for 800x600 resolution, and is best
viewed in Netscape 4.0 or above with 16bit color or higher.
BSP is the sole creation of
Yahn Bernier. I am only a
dedicated user, reporting news and making tutorials so Yahn can spend more
time enhancing BSP.
This web page was created and is being
maintained by me (DeadMeat). Unless otherwise noted, all content appearing on this site
was written by me. Also, 'DeadMeat's BSP Tutorials' were created entirely by me. All unauthorized use is
prohibited. (c) 1997. So there :-P
