Quake - Lesson 4 - Wind Tunnels and Jump Lifts
One of the really cool features of Quake is the
trigger_push entity. This entity gives you the ability to make wind tunnels,
jump lifts, and simulate water currents. It adds a whole new dimension to the game.
This lesson will show how to do wind tunnels and jump lifts. Another lesson
will demonstrate water currents.
Wind tunnels aren't that difficult to make, but there
are some things to watch out for. As usual, we'll need a map to use. I've provided
one
here if you need one.
Okay, let's get started. In the Top View, draw a
64x64 brush, centered on (-192, -64). Switch to a side view, set the
bottom of the brush at 88 and stretch the top to 408. Go ahead and
apply 'COP1_1' as a texture. Make a copy of this brush and drag it so
that it is centered on (-384, -64) and is at the same vertical
position as the first one. Don't worry, we'll hollow these out later.
Next, let's draw a brush (in the Top View again)
from (-352, -32) to (-224, -96). Set the top of this brush at 408 and
the bottom at 320 on the Z axis. These three brushes provide the
structure of our tunnel, but they're still solid. Let's hollow them
out now. Draw a new 48x48 brush, centered on (-192, -64). Set the top
at 400 and the bottom at 80. Now subtract it from the map and delete
it.
Do the same thing in the other vertical shaft. Draw
a 48x48 brush, centered at (-384, -64), with its top at 400 and the
bottom at 80. Subtract it and delete it.
That should hollow out our two vertical shafts. Now
let's hollow out the top horizontal shaft. Draw a new brush from
(-368, -40) to (-208, -88) in the Top View. Set the top at 400 and the
bottom at 328. Subtract this brush and delete it. We now have a hollow
tunnel extending up from one room and down into the second room.
Okay, now to make our wind tunnel actually work, we
need to use the 'trigger_push' entity. This entity, when activated,
will push the player in the direction of its angle setting. Unlike
some other entities, this 'trigger_push' entity can be any size you
want. That way you can push the player a long way.
In the Top View, draw a 48x48 brush, centered in
the first vertical shaft. Align the bottom of the brush with the
bottom of the shaft and stretch the top of the brush to 336 on the Z
axis. Switch to the Entity Window and make this brush a 'trigger_push'
entity with an 'up' angle. This entity will propel the player upwards
into the tunnel. You'll notice that the entity stops at the top of the
shaft. That way the player stops at the top and our next brush can
push him sideways.
Switch back to the Top View and draw a new brush
from (-368, -40) to (-168, -88). In the Side View, set the top of this
brush at 400 and the bottom at 328. Make this into a 'trigger_push'
entity and give it an angle of 180. This will push the player
horizontally.
That completes our wind tunnel. Go ahead and
compile your level and run it in Quake. Stand under the vertical shaft
in the first room and jump up. The tunnel should carry you into the
next room and deposit you there, with a bit of a hard landing. You'll
notice that it's awful dark in the tunnel. You can put a couple of
soft lights in there if you want, so the player can see where he is
going, but it's not necessary. One idea that might work well for a
trick is to put a silent teleporter inside the wind tunnel. Then the
player will have no idea where he is when he comes out the other side;
he might not even know he was teleported. It could make for a nice
disorienting trick.
There are other things you can do with wind
tunnels, though. Switch back to BSP and let's add a grenade launcher
to our map. Draw a brush somewhere near the wind tunnel and make it
into a 'weapon_grenadelauncher' entity. You can even add a case or two
of grenades if you want, so you'll have some ammo to play with. Now
run your map in Quake. Grab the grenade launcher and stand near the
door so that the door opens and you can see the exit of the wind
tunnel. Shoot a grenade up into the wind tunnel entrance. Hopefully,
it will run through the tunnel and exit in the other room before it
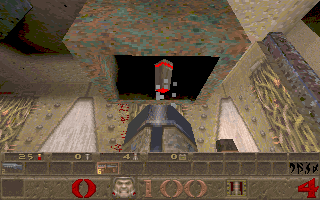
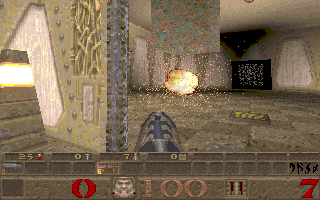
explodes. The first picture shows a grenade being shot up into the
tunnel. The second picture shows it coming out the other side. Pretty
cool, huh?
Now it's possible that your grenade might not make
it through the tunnel. If it bounces off the sides too much as it goes
through, it will explode before it makes it all the way. I've found
the best way to make it work is to stand directly under the tunnel and
shoot it as straight up as you can. The problem lies in the fact that
we have right angles in our tunnel. This makes places where the
grenade can bounce around and impedes its progress through the tunnel.
In a straight tunnel, you can shoot grenades much farther without them
getting hung up. I just wanted you to see it work.
Over the last few months, I've had a
lot of requests from readers on how to make various items of
architecture. One of the more requested items has been how to do a
Jump Lift. If you don't know what a Jump Lift is, I'll tell you
briefly. I first saw these in Jim Lowell's Critters level. I don't
think they appear in any of the Quake levels, but there are a couple I
haven't played, so I could be wrong. Basically, it's a vertical wind
tunnel with a platform that covers the top opening after the player
passes through it, allowing him to land on the platform rather than
fall back through the tunnel again. It's a pretty cool way to make a
lift without using the same old elevator you see all the time. They're
really not that hard to make, so let's dig in, shall we?
In the interest of saving time, I've
prepared a different map for us to use for jumplifts. Download it
here.
Okay, the first thing we need to make is the
vertical wind tunnel. I'll rush through this pretty quick. If you feel
lost trying to follow what I'm doing, review what we did above (on the wind tunnel)
to refresh your memory. I'll do
my tunnel a little differently than we did then, but the concept is
the same.
Let's start out by drawing an 80x80 brush in the
Top View. Center this brush at (-152, -32), which will put it in the
middle of the room. In the Side View drag the top to 304 and the
bottom to 80, then give it a texture you want to use. I chose COP1_1,
but anything you want to use will work fine. Now with that brush still
selected, click on the N-Sided button and enter 8 for the number of
sides and 40 for the radius. Click OK to complete it and you will now
have an octagonal brush.
Let's copy this brush and paste a new one, dragging
the new brush so that it sits directly in the same place as the first
one. Now with the second brush still selected, click on the Scale
button and enter 1.2 for the X setting, 1.2 for the Y setting and
leave the Z setting at 1.0. Click OK. This makes our second brush
bigger than the first so that it fits around the outside of the
original brush.
We're ready to hollow out our tunnel now, so go
back and select the inner brush (the one we drew first). In a side
view, drag the top and bottom of this brush so that it sticks out
above and below the outer brush. Click on the Subtract button and then
return the top and bottom edges of the brush to their original
position. That will hollow out the outer brush so we have a tunnel
now.
Okay, with the inner brush still selected, let's
use it to make a trigger_push entity. Assign it an 'Up' angle, but
leave all the other settings at the default. They will be fine the way
they are.
Now if you want, you can run your map in Quake and
try it out. You will have a vertical wind tunnel. You can jump up the
tunnel, but you may get trapped at the top. Everytime you start to
fall, the trigger_push will throw you back up to the ceiling. That's
not really what we want, but I thought it was a good idea to test our
wind tunnel to make sure it was working properly before we went on.
If everything is working properly, return to BSP
and now we'll make a door that will sit on top of the wind tunnel and
close under the player, giving him a place to stand. Go to the top
view and draw a brush from (-152, 16) to (-104, -80). In a side view,
set the bottom edge of this brush at 304 and the top at 312. I chose a
texture of METAL2_4 for my door, but again, use whatever you want.
Copy this new brush and paste a copy. Drag this pasted copy over so
that it lines up over the left half of your tunnel opening (in the Top
View). With both brushes together, the tunnel should be closed off.
Make sure the left hand brush (the one we just
pasted) is still selected and switch over to the Entity Window. Make
this brush into a 'func_door' entity. Give it an angle of 180 and set
the following key/value pairs: "speed" "1000", "lip"
"0", "wait" "1". Also click the
'START_OPEN' checkbox (I'll explain why in a moment). Once you get all
these set, switch back to the brush that makes up the other half of
our door and do the same thing to it, only make the angle 0 rather
than 180.
If all that is done correctly, you should be ready
to run your map. Compile it and load it into Quake. Now when you jump
up the tunnel, the door slams shut under you and you have a place to
land. As long as you're standing on the platform, it won't re-open, so
it makes a pretty good place to stand. Cool, huh?
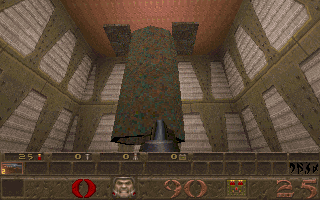
Here are some screenshots to show you what you
should see. The first one shows what the player sees from the floor.
Notice the 'door' is open. Of course, if there were a floor there, you
wouldn't see the door, but for the interests of clarity, I left out
the second floor:
Now, this is what you will see when you're standing
on top of the platform. See, there's no way to go back down the tunnel
from here:
Here's a shot from the ceiling, just to show you
what it looks like from above when the door is open:

Now there are a couple of other things you could do
here if you wanted. I merely showed the simplest method to implement
the Jump Lift. I chose 'START_OPEN' for my door so that the player
could look up the tube and see it open. Ideally, there would be a
second floor here that the player could run around on after he jumped
up the lift and you would want the player to maybe get a glimpse of it
by looking through the tube.
Of course, if you wanted to, you could have the
door start out closed and attach it to a 'trigger_multiple' entity
inside the bottom edge of the tunnel. That way the door would open as
the player jumped into the tunnel. You might have to adjust the 'wait'
value depending on the length of your tunnel. It's really up to you.
Just remember that the door has to move quick (that's why I gave it a
1000 speed setting) or the player will hit up against it. You also
want it to shut before the player lands back on it (hence, the wait
value of 1 in our map).
Well, like I said, this is a pretty easy piece of
architecture to make, but it breaks up the monotony of having the same
old platforms all over your level, don't you think?
Well, that does it for another lesson. Hope you found it useful. See you soon!
This site is designed for 800x600 resolution, and is best
viewed in Netscape 4.0 or above with 16bit color or higher.
BSP is the sole creation of
Yahn Bernier. I am only a
dedicated user, reporting news and making tutorials so Yahn can spend more
time enhancing BSP.
This web page was created and is being
maintained by me (DeadMeat). Unless otherwise noted, all content appearing on this site
was written by me. Also, 'DeadMeat's BSP Tutorials' were created entirely by me. All unauthorized use is
prohibited. (c) 1997. So there :-P