Quake - Lesson 1 - Slipgates
Note: if you've never used BSP before, I suggest
that you review some of my
General BSP tutorials to get a feel for using the
editor. These tutorials for Quake-specific items will be geared to people who are already comfortable
with BSP.
In this lesson we're going to make a
slipgate (that's a teleporter to all you Doom fanatics). I've made a
map for us to use. It's basically the map you end up with at the end
of BSP lesson 4, if you already have it. If you don't, you can download it
here. Unzip this to c:\bsp\quake\maps and
load it into BSP to get started.
Slipgates are pretty easy to make, so this lesson
won't be too difficult. There are basically three different types of
slipgates that most people use. Number 1 is a standard teleporter -
allowing quick transport of the player across large areas of the map.
The second common use is as a level exit (like in the Slipgate Complex
level of Quake). And the third usage of slipgates is to select the
difficulty level, as in Quake's Start Map.
This lesson will only cover the teleporter-type
slipgate. Later lessons will cover the other two types. The
construction is similar, it's just in the entity definition that the
differences occur.
Okay, let's get started. In the Top View, draw a
brush from (-896, 64) to (-880, 40). Make the bottom of the brush sit
on the floor and raise the top of the brush to 128. Go ahead and apply
the texture 'ECOP1_1' to your new brush. Now copy and paste this brush
and drag the new copy so that it stretches from (-896, -40) to (-880,
-64). These will be the two sides of a frame in which our actual
teleporting entity will sit.
In the Top View again, draw another brush, from
(-896, 40) to (-880, -40) and give it the same texture. Drag the top
of this new brush to 128 and drag the bottom of the brush to 112 on
the Z axis. Copy this brush and paste it, dragging the new copy to sit
on the floor, completing your frame.
Now we're ready to add the teleporter to our frame,
so draw a new brush from (-892, 40) to (-884, -40). Set the top of the
brush at 112 and the bottom at 16. Give this brush a texture of
'*TELEPORT'. This brush won't actually be the teleporter, but the
entity we will make for the teleporter is invisible, so we need this
brush for visual effect.
Make a copy of this new brush and paste it back to
the same location as the original. With the pasted copy still
selected, switch to the Entity Window and make this brush into a
'trigger_teleport' entity. After you click on the 'Make Entity'
button, enter 'target' in the key box and 't1' in the value box (don't
put in the quote marks). Click on the '+' sign and your key/value pair
is added. Basically, what you're doing here is creating a trigger,
called 't1'. You can call this anything you like, but I like to keep
them simple and easy to remember. This trigger will match up with the
destination entity, which we will make next.
Now make a new brush from (-384, 8) to (-368, -8)
and make it into a 'info_teleport_destination' entity. After you click
'Make Entity', click on the '180' button to assign an angle. This
angle determines the direction the player is facing when he lands
after teleporting. Also, we need to add a key/value pair to this
entity. Enter 'targetname' in the key box and 't1' in the value box.
This matches up the destination with the teleporter we made earlier.
If you've done everything right, you should see a
purple arrow connecting the teleporter with the destination. This only
shows up in the editor and let's you know where the teleporters go.
This feature is handy later on as your map grows more complex and it
becomes difficult to keep track of everything. Now, make sure this
teleport destination entity is sitting on the floor and we're ready to
test it out.
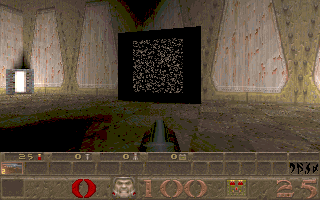
Save your level, compile it and
run it. Here's what you should see:

When you step through the teleporter, you'll end up
back near the door. Cool, huh?
You might have noticed that there were a couple of
flags in the entity window you could set if you wanted. The 'Silent'
flag suppresses the teleporter sound' and the 'Player_Only' flag
prevents monsters from teleporting. (Nothing like re-stating the
obvious...)
Well, that's all there is to it. See, I told you it
was easy. Of course you can make these teleporters any shape you want.
You don't even need the brush with the '*TELEPORT' texture. If you
leave it out, your teleporter will be invisible (which might come in
handy as a neat trick in your map).
One more thing you might want to consider. In most
maps, people put some type of indicator on the floor to show where a
teleporter destination is. That way in deathmatch the players know not
to stand around on that spot, or they risk being telefragged. You
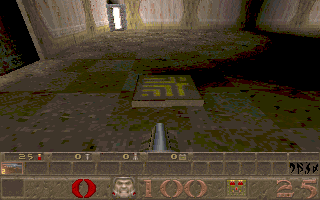
don't need one, but I thought I'd mention it. In this map, I'm going
to put one in, so I made a 32x32 brush 4 units high with a texture of
'TECH04_2' on the sides and 'TELE_TOP' on the top. I scaled the
texture by 50% in each direction and made the teleport destination
entity sit on it, rather than on the floor. It looks like this in
Quake (don't stand here in a deathmatch!!)

That's it for this lesson. Now go forth and telefrag
someone! Happy Quaking!
This site is designed for 800x600 resolution, and is best
viewed in Netscape 4.0 or above with 16bit color or higher.
BSP is the sole creation of
Yahn Bernier. I am only a
dedicated user, reporting news and making tutorials so Yahn can spend more
time enhancing BSP.
This web page was created and is being
maintained by me (DeadMeat). Unless otherwise noted, all content appearing on this site
was written by me. Also, 'DeadMeat's BSP Tutorials' were created entirely by me. All unauthorized use is
prohibited. (c) 1997. So there :-P
