Lesson 2 - Making Light Entities and an
Introduction to 2D Clipping
Note: This tutorial was written for Quake mappers. I have also created a
Quake2 version
and a
Hexen2 version of this same tutorial. Read that if you are doing maps for either of those
games. The content is the same; it's just the texture/entities/screenshots that have
changed.
Welcome to BSP lesson #2. If you still have your 'Lesson1.map'
file from Lesson 1, you can use it in this lesson. Otherwise, just create
a rectangular 6-sided with the following dimensions 'X=512, Y=256, Z='128".
Be sure to put in an 'info_player_start' entity. If you don't remember
how to do this, refer back to
Lesson 1. If you
want the coordinates to match up with what I mention here, center your room
on (0,0) in the Top View and make sure the floor is on 0 in the Z axis.
Okay, as you remember, at the end of lesson 1, we
had a room and a starting position, but the lighting was screwed up.
That's because if you don't put in any of your own lights in a Quake map,
your map will be lit fullbright. We don't want that in our map.
So, in this lesson, I'll show you how to make a light fixture and
add a light entity to your map.
Fire up BSP and load lesson1.map if you haven't
already. Now, before we do anything else, let's save this map under
the name 'lesson2.map'. That way we can keep track of what we are doing
each lesson. Also, it's good practice when map building to make
incremental copies as you go. That way if you get totally screwed up,
you can go back to an earlier version without losing your entire map.
Believe me it happens to everyone and it will happen to you at some point.
Now if you wanted, you could just put in some invisible light entities
and your room would be lit. But, in most cases, it's best to make some type
of light fixture (a torch, lamp, etc.), rather than just sticking in
an invisible light source. That will make your map seem more
realistic, plus it adds detail to an otherwise dull map. There are
uses for invisible light sources and we'll talk about those later on, but
for now let's create a light fixture. I'll show you how to make a military
light post that emits light from the top, as if there is a light embedded
in the top of the post.
If you want to see what a military light post looks
like, there are several of them in the Slipgate Complex level in
Quake. They're pretty easy to make, so let's give it a try.
First hit {esc} to make sure no brushes are
selected. This is a good habit to repeat just before you create a new
brush. That way you don't inadvertantly screw up a brush you've
already drawn (again, that's the voice of experience speaking :).
Draw a brush in the Top View from (-248,120) to (-224,96).
If you don't remember how to draw a brush, refer back to
Lesson 1. After you've gotten the brush
drawn, switch to one of the side views and make the brush 64 units
high. Also, make sure the bottom of your brush is sitting on the floor
(0 on the Z axis, in this case).
Got it? Good. Now apply a texture to the brush, using the
same techniques described in Lesson 1.
I used 'TLIGHT11' for my map - that's the same texture used in the light
post in Slipgate Complex.
Once you've got the texture applied, switch to the
Front View. You might also want to zoom up to 200%. It will make
positioning the mouse cursor easier for what we're going to do next.
You can change the zoom on a 2D window by clicking on the button in
the upper left corner of the window. The default is 75%. After you
zoom the screen, you may need to reposition the camera so that your
brush is in the center of the window.
Since we don't want the light post to be a
rectangle, let's clip it so that it's more of a pyramid shape. To do this,
we'll use brush clipping. In BSP, clipping is performed by setting a
clip plane and then carving the brush by that clip plane. You can do this
in 2D (simple) or 3D (more complicated). Sound hard? Trust me, it's really not.
I'm only going to show you 2D clipping in this lesson. 3D clipping is
covered in a later lesson, since it's more advanced and takes more practice
to get right.
In order to set the clip plane, we need to set two 'clip' points. The clip
plane will extend infinitely through these two points and carve any brushes
(that are selected) that intersect this plane. To set a point, you
simply Shift-Right-Click wherever you want the point to be set. The order
in which you set the clip points around your brush affects which portion of
the brush gets clipped, so it's important to get them in the right order. Don't worry if you set them
backwards, though, because you can flip the clip plane easily enough.
Let's set our first clip point. Position the mouse
cursor at (-248,0) in the Front View window and Shift-Right-Click.
You'll see a yellow dot appear with the number 1 under it. That's our
first point. Now move the cursor to (-240,64) and Shift-Right-Click
again. A second clip point has shown up and your brush appears to have
been clipped. If the top left corner of your brush has 'greyed-out',
you've done it right. If all you see is the top left corner (the rest
of your brush is greyed-out), you've set the points in the wrong
order. Not to worry. Simply click on the 'Flip' button and the
opposite side of the brush will be clipped instead.

Flip Button
Once you've gotten the clip plane set correctly,
your brush should look like the one pictured below (I turned the
grid off for clarity):

If yours doesn't look like that, re-read the
previous paragraph and try setting your clip points again. If it looks
okay, you're ready to actually carve your brush. Click the 'Carve' button. The
portion of the brush that is shown with grey dotted lines is the
portion that will be discarded when you carve it so make sure you have it set
properly before carving.

Carve Button
When you click on this button, your brush is carved
and the clip points disappear. That was so easy, let's do it again!
Set another clip plane from (-232,64) to (-224,0) and carve your brush
again. That takes care of two sides of our brush. Now switch to the
Right View and clip from (96,0) to (104,64) and carve off another
side. Last but not least, carve from (112,64) to (120,0) and carve the
last side. Now, assuming everything went correctly, you should have a
brush which slopes inward on all sides. Switch to the 3-D textured
preview and check out your creation.
At this point, we've got the light post created, but we
haven't put in the actual light yet. To add a light, we need to create a
'Light' entity. Switch back to the Top view and hit {esc} to deselect
your brush. Draw a new brush from (-248,120) to (-232,104). Switch over to
the Entity window and select 'Light' from the drop-down list.
Click on the Make Entity button and presto! Your light has been
created.
Of course, it's not enough to just create the
light; we also need to set its brightness. If you don't do this, the default
of 300 is used and that's a little bright in most maps. It's easy to set
a different value though. Near the top right corner
of the Entity window are two buttons labeled '+' and '-'. With your light
entity still selected, click the
'+' button. A dialog box will pop up with two text boxes, labeled
'Key' and 'Value'. Click inside the 'Key' box and type 'light'
(without the quotes). Hit {tab} to move to the 'Value' box and type
'250' (again, no quotes). Then click on the OK button to add this key
value pair to your entity. This assigns a brightness level of 250 to
your light. This is a reasonable level, but the actual value you use
in your own maps will depend on how many other light sources you have
in the room and what kind of atmosphere you want. Light sources can
range from 0 to around 1000, but it takes a lot of experimentation to
find one that works well in a given situation.
You might have noticed the button at the bottom of
the key/value dialog box that said 'apply to all selected entities'.
This allows you to select a whole bunch of entity brushes (lights for
example) and set the key/value for all of them at the same time. This
is really useful for changing the light level for a bunch of light
entities at the same time, or for setting the skill level on a large
group of monsters all at once. Just remember that the key/value pair
you assign has to apply to all of the entities you have selected. You
can't put a 'light' key on a monster for example.
We need to do one more thing before we can compile
our map. Switch back to one of the side views and drag your light
entity to a position so that it is positioned directly on top of the lightpost
brush you drew earlier. That way the light will appear to emanate from
the top of the post. Make sure the light entity is not embedded more
inside the lightpost. If it is inside the post, QBSP will
clip it away and you won't see your light when your level runs.
Well, that's it. Now save your map as 'Lesson2.map'
and
compile it. Run your map in
Quake (if it isn't already loaded)
and you should find yourself standing in a dark
room, with the only light coming from your newly-created light post.
Cool, huh?
Of course, the room is still too dark, so exit
Quake and return to the Top view window in BSP. Since we've gone to
all that trouble to make a light post, let's make a copy of it and put
it in another corner. Hit {esc} to deselect all the brushes and then
select your light post brush by Shift-Left-Clicking on it. You might
notice that when you tried to select your light post, some other brush
got selected instead. This is because looking down from the top of
your map, there are potentially 3 different brushes you could have selected.
(4 if you count the light entity). These are referred to as 'hit
brushes'. We need a way to tell BSP which one of the three we are
selecting.
Fortunately, you can cycle through the hit brushes
by Shift-Left-Clicking on the brush and holding the mouse button down.
As long as you hold the mouse button, BSP will cycle through all
potential hit brushes lying under the mouse cursor. Sometimes, when
you first start the cycle, more than one brush is selected. If this
happens, just let it cycle clear through once and then you can go one
at a time. However, if there is an entity brush that is in the cycle,
that brush is selected by default and you can't cycle through the others. If this
happens, you may have to select your brush in a different view.
Fortunately, in BSP there's an even easier way to select the brush or
brushes you want. Find the brushes you want to select in the 3D view and simply click on them
(no Shift-key necessary).
Each brush you click on gets selected. Clicking on that brush again deselects it.
This makes it easy to get just the brush you want without having to
cycle through the 'hit' brushes all the time. If you have your 3D window in the
upper left corner of your screen, like I showed in Lesson 1, it's easy to do it
this way. Just a matter of preference though. Make
sure you've got the Light post brush selected and are in the Top view
before continuing.
Now that the Light post has been selected, we also
want to copy the Light entity, so select that brush by
Shift-Left-Clicking on it (notice it selects without having to cycle).
Now, hit {Ctrl-C} or select 'Copy' under the Edit menu and hit
{Ctrl-V} or select 'Paste' from the Edit menu to paste a new copy of
your Light post into the map. The new brushes you just pasted are
still selected, so drag them down to the lower left hand corner of
your room and position them 8 units from the South wall and 8 units
from the West wall. Switch to the Front view and make sure your new
brush is sitting on the floor and that's all there is to it.
Let's go ahead and put another light post in each
of the corners on the East side of the map too. Copy and paste them just
like you did the last one.
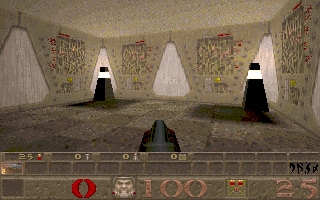
Now save and recompile your map again and see the
results of your work. It's definitely looking better now isn't it?
It's still a little dark in the center, but we'll take care of that in
the next lesson. Here is a screenshot of how your level should look so far:
Okay, now let's make a change to one of our lights; let's make one of them flicker
a little bit. Select the light entity in the upper
left hand corner (Top View). This is the first light we created. Once
it's selected, switch to the Entity window and click on the '+'
button. Type "style" in the Key box and "1" in the
Value box (remember to leave off the quotes). Click on the OK button
and the light will be changed to a flickering light. (Run the map if
you don't believe me)
You might be wondering how I knew to put 'style'
'1' on the entity. Well, for Quake, that's easy. In the entity window is a little
'?' button. Click on this and a help window pops up with all the
information you need to know about the currently selected entity. In
that box I found the style settings and picked one I wanted. There are also some entity specs popping up at various
places around the web, so you may need to get them in order to find the
keys you can assign to the different entities.
That's all there is to adding lights to a map. Well, our map is definitely getting better, so
let's save it and take a break. We'll do some more lighting and make a
monster for our map in lesson 3. Feel free to play around on your own
with making light fixtures, but keep your Lesson2.map the way it is.
We'll be building on it in later lessons. Until then, have fun
Quakin'!
This site is designed for 800x600 resolution, and is best
viewed in Netscape 4.0 or above with 16bit color or higher.
BSP is the sole creation of
Yahn Bernier. I am only a
dedicated user, reporting news and making tutorials so Yahn can spend more
time enhancing BSP.
This web page was created and is being
maintained by me (DeadMeat). Unless otherwise noted, all content appearing on this site
was written by me. Also, 'DeadMeat's BSP Tutorials' were created entirely by me. All unauthorized use is
prohibited. (c) 1997. So there :-P