Lesson 3 - Brush Subtraction, More Lighting, Monsters
Note: This tutorial was written for Quake2 mappers. I have also created a
Hexen2 version
and a
Quake version of this same tutorial. Read that if you are doing maps for either of those
games. The content is the same; it's just the texture/entities/screenshots that have
changed.
Welcome back. In lessons 1 and 2, we've been
creating a map. If you did those lessons, you should have a file
called 'Lesson2.map'. If you don't have it you can download it
here.
In this lesson, we'll work on adding a little more
light to our map by adding a window in the ceiling. Then, as promised,
we'll put our first monster in! Now we can kill sumthin'!
As you remember from lesson 2, our map has 4
light posts, but there is a dark spot in the center of the room. If we
add a skylight in the ceiling and give it a sky texture, then
it will look like light from the sky is shining into our room. In
order to add a window, we'll need to use a technique called brush
subtraction.
Brush subtraction is used whenever you want to cut
a hole in a brush you already have drawn. The process involves making
a brush in the shape of the hole you want to make, positioning this
brush so that it sticks through the brush you want to make the hole
in, subtracting the brush, and deleting the subtracted brush
(optional, depending on what effect you're creating). It's not as
complicated as it sounds, but it can be a little tricky. Don't worry,
though, I'll go through each step in detail.
If you haven't done so already, start up BSP and
load 'Lesson2.map'. Before we change anything, let's save our map
under the name 'Lesson3.map'. That way we won't change anything we've
already done.
Switch over to the Top View and draw a brush from
(-128, 64) to (128, -64). Now switch to a either the Front View or the
Right View and drag the top of your new brush to 144. Drag the bottom
of the brush to 120. Notice how this brush 'sticks through' our
ceiling brush now. This brush is going to end up being a metal border
around our skylight, so it sticks out the bottom of the ceiling a
little. This isn't necessary, but adds a little decor to the map.
Go ahead and switch to the Texture Browser window
and apply the texture 'FLORR1_6' to our new brush. You know, while
we're at it, let's make our brush something other than a boring old
rectangle. For that we'll need to clip off the corners, like we
learned in Lesson 2. Switch back to
the top view and clip from (-128, 40) to (-96, 64). Also clip from
(96, 64) to (128, 40), (128, -40) to (96, -64), and (-96, -64) to
(-128, -40). If you need more specific instructions on how to do this,
refer back to
Lesson 2.
Once you've got this brush clipped into shape,
click on the 'Subtract' button to subtract it from the ceiling brush.

Subtract Button
Now, let's make another brush that will end up being the sky. Hit {esc} to
deselect your new brush and draw a brush from (-120, 56) to (120,
-56). Now clip off the corners so that it fits inside the Metal brush
we just drew. Clip points will be (-120, 32) to (-88, 56), (-88, -56)
to (-120, -32), (120, -32) to (88, -56), and (88, 56) to (120, 32).
Next, switch to the Front View and
drag the top of our Sky brush to 160. Drag the bottom of the Sky brush
to 112. Let's go ahead and apply the 'Sky1' texture to the brush. A quick note
about sky textures in Q2. There is only one texture (Sky1), but you can control
what sky gets displayed by adding a key/value to your Worldspawn entity. I'll
show you how to do that in a minute.
Now, while we're still in the Front View, click the Subtract
button again, to cut a hole.
When you click this button, what actually happens
is this: Each brush that your Subtraction Brush intersects gets
divided up into a bunch of smaller brushes. That way we don't end up
with any illegal brush shapes that cause Quake2 to crash. You don't
really need to know this, but after you cut out this hole, you will
see your ceiling brush has been split up into several brushes. Just
thought you would like to know why.
Now that we've subtracted the brush, we can move
the bottom of our sky brush (it should still be selected) up to 144.
That way the sky will appear to be above the window, which is the
effect we want. We could delete the brush altogether, leaving a hole
in the ceiling. This would be handy if we were going to put another
room above this one, but in this case we left our Subtraction Brush
and used it for the sky.
Okay, we're almost ready to try our map out, but we
need to add a light source in the window before we do. That way light
will appear to come in through the window. You have a choice here. You can
switch back to the Top view and make a 16x16 brush, centered on the
coordinates (0,0). Switch to the Entity Window, make it a 'Light' and assign
'light' '300' as the Key/Value pair. Switch to the Front view and drag your Light up until
the top of the Light sits on 144, which is the bottom of our 'Sky'.
Alternatively,
you can hit 'S' to bring up the Surface Window and click on 'light' and add
a value of '300' in the value box and click on 'Apply Brush' to make the light
texture itself give off light. This has the advantage of giving a more consistent
distribution of light in the room, but as you'll see in the screenshot below, it creates
a shadow around the rim of the window that looks a little strange.
Well, we're ready to try out our map, so save it
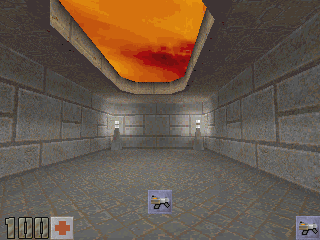
and compile it. Once Quake2 runs, look up at the sky shining in through
the ceiling. Neat, huh? Also notice that the center of our room is
lighter now. But, notice the dark shadow around the rim of the window. Using
a light entity instead of a light-emitting sky texture will remove this.
Actually, other than that, this room's looking pretty good.

You can see how easy it is to create interesting
effects with brush subtraction. In the next lesson, we'll use
subtraction to make a door and connect to another room.
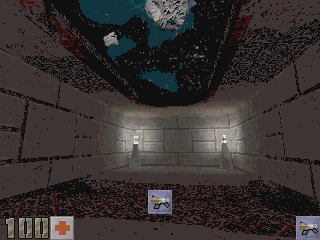
Now, if you wanted to change to a different sky,
like the Outer Space sky for instance, here's how you do it. Deselect all brushes
and switch over to the Entity window. Click on '+' and enter a key/value of 'sky' 'space1' and
click 'OK' to apply it to the Worldspawn entity. Now, run your map and you should
see a starry sky above your window. (Of course, you probably don't want
a light entity here now, or you may want to remove the 'light' value from the
sky texture). Just thought you might want to see that.
There are 10 different sky
textures available in Quake2. The names range from 'Unit1' to 'Unit9' and of course
'Space1'. When you select one of these sky types for your Worldspawn key, then
wherever you use the SKY1 texture in your map, Q2 displays the appropriate sky
texture. Remember that the sky textures in Q2 'wrap around' the entire level, so
you can see a far-off landscape if you use the SKY1 texture on a window. If you leave
the Worldspawn key off, Unit1 is used by default.

Okay, now as promised, we'll make a monster in our
map. While we're at it, let's make a different monster appear
depending on what skill level you're playing. That's an easy way to
make your map playable by people who are new to Quake2, as well as
still being enjoyable by veterans.
Draw a new brush from (-192, 16) to (-160, -16).
Switch to the Entity Window and make this brush into a 'monster_infantry'
entity. That will make an Enforcer that you can kill pretty
easily. After you click on 'Make Entity', click the '0' button, to
make the monster face East, then check the '!hard' and '!dm'
checkboxes. That will prevent this monster from showing up in the Hard
skill level and from showing up in Deathmatch. They don't show up in
Quake2 in Deathmatch anyway, but it never hurts to set this just in
case. Make sure to set the skill flags after you click 'Make Entity' not
before. If you do it before, you will actually apply the skill flags to your
worldspawn entity and your map won't run.
Okay, now switch to the Front view and check to
make sure the bottom of the entity brush is resting against the floor,
and that's all there is to it. We've just created a monster. Save your
map and play it if you want, but we're not quite finished yet.
Deselect your brush and draw a new one on the same
spot as the first one. That way this monster will appear in the same
spot as our first one. Now switch to the Entity Window, select
'monster_gunner' from the drop-down list and click on the 'Make
Entity' button to create a monster that's a little tougher. Now while you're in the Entity window, clear the
'!hard' box and check the '!easy', '!norm', and '!dm' boxes. This will
make the Gunner appear only in the Hard skill level.
Got it? Alright! Now, save your map as
'Lesson3.map' and
compile it.
Now when Quake2 runs, you should see an Enforcer standing in front of you.
Let it kill you. (I know it's hard not to blast away isn't it?) After
you're dead, hit '~' to bring down the console and type 'skill 2'. Hit
'~' again to remove the console and hit the 'ctrl' button to restart
the map. Now, instead of an Enforcer, there should be a Gunner. Same
map, different difficulty level. If you want, you can let it kill you
and switch back to 'Skill 1' to see the Enforcer, but take my word for
it. It's still there.
Whenever you're done playing with your new-found
friends, exit Quake2 and return to BSP. We're going to go ahead and
delete both monsters. I know you went to a lot of work to create them,
but everytime you play-test your level, they will be there just
waiting. They can really get in the way for now, so let's just get rid
of them. Select one of the monster brushes (the enforcer is probably
still selected) and click on the Trashcan button to delete it. Now do
the same with the other monster. That way we can play-test our level in
peace, but at least you know how easy it is to control the difficulty
levels in your maps.
Well, that wraps up Lesson 3. In the next lesson,
we'll make a second room and build a door to connect it to the first.
See you then.
This site is designed for 800x600 resolution, and is best
viewed in Netscape 4.0 or above with 16bit color or higher.
BSP is the sole creation of
Yahn Bernier. I am only a
dedicated user, reporting news and making tutorials so Yahn can spend more
time enhancing BSP.
This web page was created and is being
maintained by me (DeadMeat). Unless otherwise noted, all content appearing on this site
was written by me. Also, 'DeadMeat's BSP Tutorials' were created entirely by me. All unauthorized use is
prohibited. (c) 1997. So there :-P
