Lesson 7 - Advanced Brush Manipulation
Welcome back! Now that we have a handle on most
of BSP's basic features, it's time to branch out and
explore some advanced features that you can use in your own maps. In
this lesson and the ones that follow, we won't actually build a map,
but I'll show you how to do things that will make your own maps more
interesting and fun. To start out, let's learn how to manipulate
brushes so that our rooms aren't all rectangle-shaped. It's not hard
to learn and will allow you to make all sorts of interesting shapes in
your own maps.
If BSP isn't already running, fire it up and click
on the 'new map' button or select 'New' from the File menu.
All right, let's talk about plane manipulation and
vertex manipulation for a minute. BSP provides a way to drag the sides
and corners of brushes around in order to make odd-shaped brushes.
This could be used as an alternative to brush clipping in some cases,
but must be used with some caution. In order
to illustrate what I mean, let's try an example.
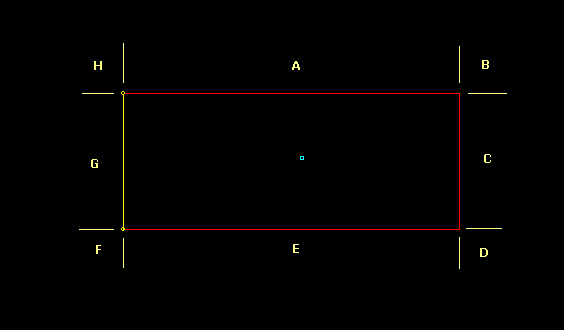
Draw a brush similar to the red rectangle in the
following picture. I've added yellow lines and letters to the picture
for discussion purposes only. I'll be referring to the sections by
their letter later on.

You already know how to drag the edges of a brush
to make a brush larger or smaller. For instance, click and hold the
mouse above the brush (in the area marked as 'A') and you can drag the
mouse up and down vertically to make the brush larger or smaller in
that direction. But if you drag the mouse horizontally while trying to
drag this face, nothing happens. If you want to make the brush larger
in the horizontal direction, you must first click in either section
'C' or 'G'. But what if you want to move side 'A' horizontally,
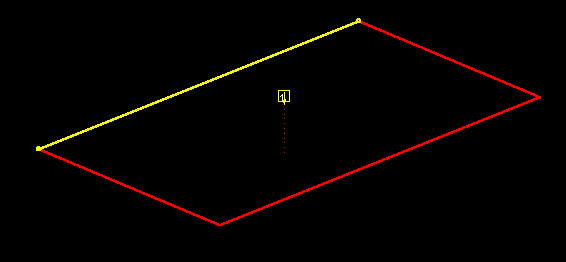
keeping side 'E' where it is? The effect will be to shear the brush
horizontally (i.e. sides 'C' and 'G' will become diagonal lines
connecting 'A' and 'E'). To see what I mean, hold down the CTRL and
SHIFT keys. Now click the mouse in Section 'A' and drag the mouse to
the left. The top edge of your brush should move to the left.
Depending on how you have BSP configured, you may see the
original line locations remain on the screen as you drag. Release the
mouse and you've just sheared the brush, like so:

Now, play around with shearing the other sides,
until your brush resembles something like this:

Okay, that's pretty easy, eh? What if after you get
your brush looking like this, you decide to make it larger or smaller?
You can still drag sides of your brush just like you did before, it's
just that now they drag in a different direction than just horizontal
or vertical. Try it if you don't believe me.
That's all there is to plane manipulation. Of
course, you can do this in all 3 different 2D viewing windows to make
any shape brush you want. This comes in handy to make ramps, or
staircase bannisters, or anything that doesn't conform to the normal
horizontal/vertical world.
But, wait there's more. What if you want to drag a
single corner of your brush? Look back at the first picture above. If
you CTRL-SHIFT-CLICK in sections B, D, F, or H, you can drag that
corner around in almost any direction without moving the other
corners.
One caution, though, you can't make a convex-shaped brush.
Quake can't handle it, so BSP won't let you do it. If you try it, BSP
may delete your brush when you release the mouse button. It doesn't
happen very often, but I have seen it a couple of times. Just watch
out for that.
To try vertex dragging out, go back to the sheared
brush we had earlier. CTRL-SHIFT-CLICK above the top-most corner and
drag that vertex around. Notice the two sides connected to it move
around also, but only the end connected to the vertex you are
dragging. The other end stays anchored in place. (Note: if both ends
of the lines are moving, you're not clicking in the right place; try
clicking again). I dragged the top and bottom vertices on my brush
around a little and ended up with a brush like this:

Of course, you can drag vertices in each of the 2D
windows, but your brush may start acting kind of strange as BSP
attempts to keep your brush shape legal. Play around with it and you'll see
what I mean.
You can use vertex manipulation to plug leaks (see
below), or to join odd-shaped brushes together to form different
shapes. I made a small hill in an outdoors area of a level I was
working on. By dragging the vertices around, I was able to approximate
a small rise in the ground without it looking too boxy.
Now that we understand plane and vertex dragging,
let's move on to something else...
We already know how to make a six-sided room (4
walls, a floor, and a ceiling), but that shape gets old real quick. So, instead
of that, let's make a room with 8 walls. Close the map we've been
playing around with (or just delete the brush if you want). Now,
switch over to the Top View and make a 208x208 brush. Clip off the
four corners of the brush so that the brush is octagonal shaped. If
you don't remember how to use brush clipping, you might want to review
lesson 2. When you've got the shape
the way you want, we're ready to create a room. Now ordinarily we
would select 'Room' from the drop-down list on the toolbar and click 'Make',
but we don't want that, so select 'extruded room' instead, then click 'Make'.
If BSP asks for a wall thickness,
type in 8. If it doesn't ask, BSP will use the grid size, it just
depends on how you have BSP configured.
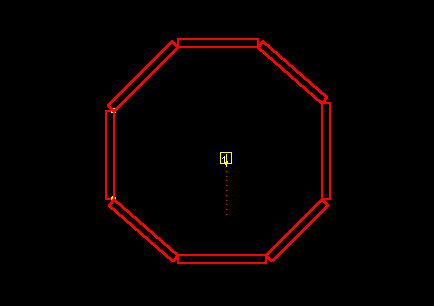
When you click this, BSP creates a room from the
currently selected brush, rather than simply making a six-sided brush.
One word of caution however, if you have a complex shape, this *might*
generate leaks so use it with care. At this point, you should see
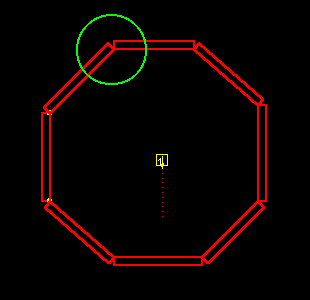
something like this, depending on where you set your clip points:

Now, with all the brushes still selected you could
add a texture. Of course you could have textured the brush before you
made it into a room, it's up to however you're comfortable working.
I'm not going to do that here, since we've covered textures quite a
bit already.
Remember earlier when I said you might generate a
leak by extruding a room from a complex brush? Well, let's say there
is indeed a leak and we've found that it's in the area I've circled in
the following picture:

Let's say that when BSP generated our room, it left
the two brushes a pixel apart in the area circled. That didn't happen
here (at least not on my computer), but the technique I'm going to
show you is still valid. How do you suppose we could plug this leak?
If you said by dragging the vertices together, congratulations, you're
learning!
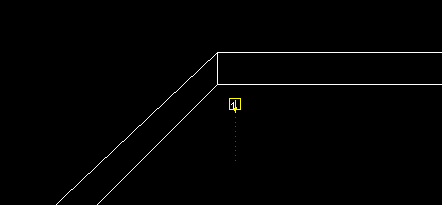
Set your grid size to 1 and zoom in on the area I
have circled. Select either of the two brushes and try dragging the
free vertex over to the other brush. If snap-to-grid is on (that's the
default) you should be able to join the two vertices together,
plugging the potential leak and preventing a gap from showing if you
happen to look at the walls from outside the room. On my screen, it
looks like this after I merged the two vertices:

Ain't no leak there now! :-)
Well, I've given you quite a bit of confusing
information in this lesson. You might need to play around with plane
and vertex dragging a while to get comfortable with it. Remember, it's
a good idea to save your maps incrementally (ie: name each one with an
incremental number like MAP1.MAP, MAP2.MAP, etc.). This allows you to
revert to a previous map
if you really get carried away and screw something up. (Gee, sounds
like the voice of experience talking...)
Well, That about wraps up this lesson. If you've gotten
to this point and are still confused, read the lesson again and
practice on some simple brush shapes. If after that you're still
confused, let me know and I'll try to clear it up for you. I've been
using vertex dragging ever since BSP supported it and I do it
as second nature. Trying to explain it to someone else is a little
difficult, so I may be a little fuzzy in spots. Good luck!
This site is designed for 800x600 resolution, and is best
viewed in Netscape 4.0 or above with 16bit color or higher.
BSP is the sole creation of
Yahn Bernier. I am only a
dedicated user, reporting news and making tutorials so Yahn can spend more
time enhancing BSP.
This web page was created and is being
maintained by me (DeadMeat). Unless otherwise noted, all content appearing on this site
was written by me. Also, 'DeadMeat's BSP Tutorials' were created entirely by me. All unauthorized use is
prohibited. (c) 1997. So there :-P
