Lesson 8 - Using BSP's Built-in Prefab Objects
Now that we know how to make brushes, texture them,
turn them into entities and move their vertices around, let's look at
some of the shape tools that BSP has built-in. Using these prefab
tools can speed up certain aspects of your map editing, but as we'll
see, they might introduce some new headaches as well. This is going to
be a fairly long lesson, so fire up BSP, create a new map so we'll
have something to play around with, and we'll get started...
So that we can test out the shapes we're going to
make and see how they look in a game, we'd better make a room to put
them in. For purposes of this lesson, I made a room 512x512 in the X/Y
view and 256 tall in the z-axis. I gave all the walls and floor a
generic texture and added a info_player_start entity. Make a room similar
to this and you should have plenty of room to play around with your shapes.
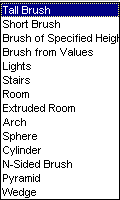
In BSP, there are fourteen different objects
the editor can make for you. These objects are found in a dropdown list
on the toolbar. Open up this dropdown box and you'll see the following list:

To create an object, just select it from the list and click
on the 'Make' button immediately to the left of this dropdown list. Some objects
require a brush to be selected, but others make a brush on their own. Now, I'll go through each
of these in detail and I'll tell you a little more about them.
Tall Brush/Short Brush
These options are no-brainers. They take the currently selected brush and makes
it 4096 units tall (Tall Brush) or 16 units tall (Short Brush) on the Z axis. I've never used these
options, but they are available if you want them.
Brush of Specified Height
When you click this, you are asked how tall you want the
brush to be and the selected brush is set to that height (Z axis).
Brush from Values
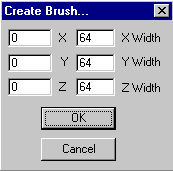
When you click this, you get the following dialog box:

The first column of numbers is the origin point on each axis
that you want the brush to appear. The second column is how big you want the brush to
be along that axis. The default values displayed will create a 64x64x64 brush, with one corner
on (0, 0, 0). The currently selected texture is applied to the brush.
Lights
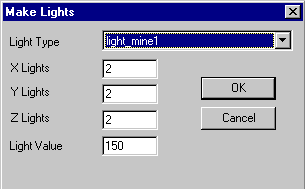
When you select this object, you get the following dialog box:

Select what type of light you want from the 'light type' box. This
list is created from the entity file you have loaded, so it's different for each game
you are editing (Quake, Hexen2, Quake2). The next 3 boxes tell BSP how many light entities
to create along each axis. The default values will create 8 light entities (2 x 2 x 2) and each
of the light entities will be given the value in the 'light value' box (150 in this case). Once you
click 'OK', you simply need to drag these entities
wherever you want them to be in your map.
Room/Extruded Room
We've already used these, but I'll mention them here for completeness.
'Room' makes a six-sided room from the currently selected brush, turning each face of the brush into
either a wall, floor or ceiling brush. Depending on how your BSP is configured, you may see a dialog
box asking you for the width of the walls you want. The default is the current
grid size.
'Extruded Room' makes a room from a non-rectangular brush. Other than that, it functions
the same as 'Room'. Review the previous lesson if you need more information on this object.
Stairs
In order to make a set of stairs, we have to first
draw a brush that will represent the area we want our stairs to
occupy. Think of this brush as a 'bounding box' that will define our
stair height and width. When we actually make the stairs, this brush
will disappear and be replaced by a separate brush for each step of
our staircase.
It's easier to explain by way of an example, so
let's make a staircase. It might make it easier to use the stair tool if
I define a few variables first. For this example, let's say we want 10
steps, with a tread depth of 24 units. Each step should be 8 units
high and 48 units wide. We'll make this staircase along the x-axis.
This makes a nice size staircase for the player to climb. Now, with
that in mind, we need to calculate how big our brush needs to be.
Since we want our brush to have 10 steps, each with
a tread depth of 24 units, then the x-dimension of our brush will be
240 (24x10). The y-dimension will be 48, corresponding to the width of
our steps. The z-dimension is 80 (10 steps x 8 units high for each
step). So, that's not so difficult. Let's draw a brush 240x48 in the
Top View and set the height at 80 units in the z-axis. Also, make sure
the bottom of your brush is sitting on the floor of the room, or the
player might not be able to climb onto your staircase. You don't want
it suspended in mid-air after all.
Once you've gotten the brush drawn, give it a
texture you want your steps to have. After you gotten your brush properly
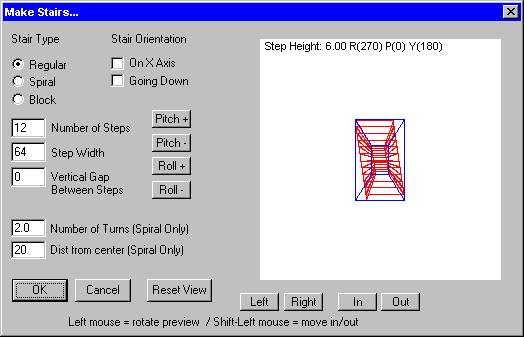
shaped and textured, click on the Stair button. The following dialog
box will pop up along with a preview of your staircase.

Now it's easy to see right off that there's a
problem. The default staircase is on the y-axis, so we need to check
the 'On X_axis' checkbox. This orients our steps in the right
direction. You can rotate the preview around using the 'Left',
'Right', 'In', and 'Out' buttons so that you can get a better view.
This doesn't move your actual brush around, just your view of it. I
clicked the 'Right' button a few times so that I could see a good side
view.
Under stair type, you can choose Regular, Spiral,
or Block. Regular is a set of steps that are suspended in the air,
with an open area underneath. Spiral steps are self-explanatory and
Block steps are the same as regular, except that each step extends the
full length of the brush, meaning there is no open area under the
stairs. Click this checkbox and you'll see what I mean. When you're
done looking, set the stair type back to Regular.
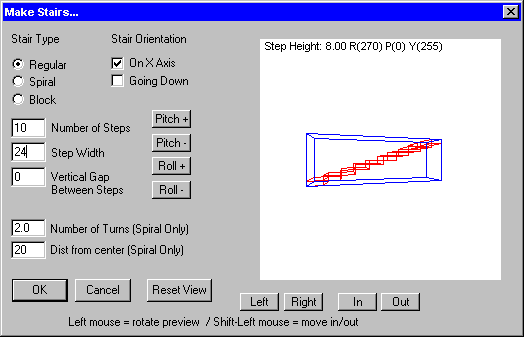
Okay, now in the 'Number of Steps' box, type 10.
You'll notice that as you change these settings, your preview is
updated to reflect the new information. In the 'Step Width' box enter
24. This is actually the depth of each step tread, not the width of
the staircase. In our example, remember, we wanted 24. Leave the
'Vertical Gap Between Steps' at 0. If you wanted, you could set this
to 4 and you would be able to see through your staircase. The steps
would be in the same position as they are now, but each step would
only be 4 units high, with 4 units open space between it and the next
step. This might be handy if you wanted to hide something under the
stairs, but let the player see it there. Here's the dialog box at this
point:

Now with all the settings in place, click 'OK' to
make your staircase. Voila! That's all there is to it. All the brushes
that make up your staircase are still selected. Drag them up to the
northern wall and drag them until the furthest step to the east is
just touching the east wall. That will get them out of the way for
later things we make. Compile and run your level and you
should see a set of steps you can climb. Of course, they don't really
go anywhere, but you get the idea. One thing to remember, in the game world,
the player can run up stairs that are about 16 units high. Higher
than that and the player will have to jump to get up each step, which
probably isn't what you want (you might though...).
Now that we've got the hang of a simple staircase,
let's try to make a spiral staircase. These are a little tricker, but
the concept is the same. Let's say we want the same size steps as
before - 10 steps, 24 units deep, 8 units high, 48 units wide. Since
these will be spiral steps, let's leave a space open down the center
so each step will be 4 units out from the center. Let's also leave 4
units vertical space between each step. This time our bounding box
will be a little different. Compute the X and Y dimensions by adding
the width of your step (48) plus any area you want to leave open in
the center of your staircase (4). this makes a total of 52. This is
basically the radius of our spiral staircase. Multiply that by 2 to
get the diameter and you now have an X-Dimension of 104 and a
Y-Dimension of 104. The Height is 120 (10 steps x 12 units: height +
vertical space for each step).
Draw a brush 104x104 in the Top View, 120 units
high on the z-axis, with the bottom sitting on the floor. Pick a
texture for this brush and click on the Stair button. Set the stair
type to Spiral, the number of steps to 10, step width to 24, and the
vertical gap to 4. Next you'll see a box labeled 'Number of Turns
(Spiral Only)'. This represents the number of revolutions your
staircase will make as it ascends. I chose .5 for mine. You really
have to watch this. If you make too many turns, then the player will
hit his head on the upper steps and not be able to climb the lower
steps. The taller your staircase, the more turns you can get away
with. It's a trial and error thing. For this example enter .5. Then
set the 'Dist from Center (Spiral Only)' to be 4. That will leave a
gap down the center of your staircase. You could put a brush in here
to simulate a pole if you wanted, but it's not necessary.
Click on OK and your staircase should be complete.
All the brushes should still be selected, so drag them up to sit near
your other staircase, comfortably out of the way. Run your map and try
out your spiral stairs. You'll see that each step is separated by a
vertical space now. Neat, huh?
Arches
Arches are pretty easy to make. In fact, Quake and
Hexen2 have several arch textures available. However, if
you want to use an 'arch' texture, there's a little trick to it. You
have to make your arch half the height you actually want it to be
(corresponding to the size of the texture), then add two pillars under
each post, to raise it up to the height you want. (Unless you want a really
short arch of course ;-)
To use the arch tool, simply draw a brush the size
and shape you want to be occupied by your arch. This brush is a
bounding box, just like in the stair tool. For this example, I drew a
brush 128x24 in the Top View and 128 units high in the z-axis. Choose whatever
texture you want. There are lots of textures that work well with
arches, depending on what type of level you're making. When you get
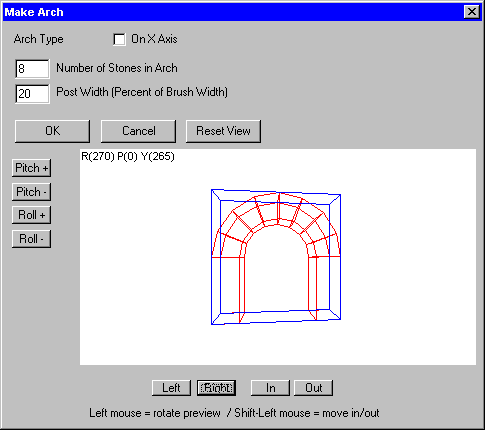
your brush sized and textured, click on the Arch button. You'll see
this dialog box:

Remember, you can use the Left and Right buttons to
turn the view so you can see your arch better. I've rotated mine to
the right in the picture above. There are only a couple of options
available here, as arches are pretty simple to make. The number of
stones in the arch controls how smooth your arch appears. This is the
actual number of stones in the arch itself, not including the 2
side-posts. The higher number of stones, the more rounded your arch
will look. Be warned, though, that higher brush counts slow down
running your level in the game, so use just enough stones to make the
arch you want and no more. I chose the default of 8 for mine. You can
go as low as 3 to make a boxy-looking arch. Try out several different
settings and pick one you like.
The post width setting controls how much open area
is available in the center of your arch. The higher this value, the
less room will be left open in the center. Play around with it and
you'll see what I mean. I'm leaving mine at 20%. Click on the OK
button when you've got your settings the way you want and your arch is
created. That's it. Move your arch somewhere out of the way in your
room and run your level to look at it if you want.
Spheres
Spheres are easier to make than arches, but there
are some problems you'll run into. First of all, it's possible that if
you create a sphere, you'll get a 'Point off plane' error when you try
to compile your level. In some versions of QBSP (like QBSP29), this is
a fatal error. In others (QBSP256 for example) it is just a warning
and your level will go ahead and compile and run properly. More
sinister is the dreaded 'CutNodePortals-r: New portal was clipped
away' error. If you get this error, your level might VIS or it might
not, it just depends on the severity of the error. If you get one of
these errors, your best bet is to delete your sphere and try again.
Sometimes creating the same sphere over again will eliminate the
problem. Of course, sometimes it gets worse...
As for making the sphere itself, there's no trick
to it. Just make a brush - size doesn't matter, because the sphere's
size is controlled by the dialog box. All your brush controls is the
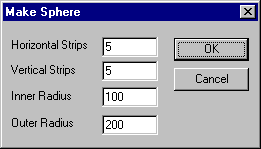
sphere's location. Make a brush and click the Sphere button. The
following dialog box appears:

The outer radius and inner radius set the size of
the sphere and the size of its hollow center respectively. Remember
that if your outer radius is 200, your sphere will be 400 units wide.
This number is the radius, not the diameter. The Horizontal and
Vertical Strips work like the stone count in arches; the higher the
number, the smoother your sphere will be. Again, remember that the
more strips you use, the higher your brush count will be and your
level could seriously lag. Also, if you create a sphere with very many
strips, it could take a long while to QBSP and VIS, due to the high
brush count.
For our example, let's make a sphere with an inner
radius of 10 and an outer radius of 50. Leave the strip values at the
default value of 5. Enter these settings and click on OK. Now position
the sphere where you want it and compile your level. Notice that it
took quite a bit longer to compile that time? I even got 2 CutNode
errors, but they were just warnings. If you run your map, you'll see that
the sphere is a little boxy looking. That's because we only used 5 for
a strip count. If we had used 10, it would have been a lot smoother,
but the cost in performance would have been terrible. Just for fun, I
tried making the exact same sphere, but making the inner radius 40
instead of 10. It seemed to compile and VIS a little faster and I only
got 1 CutNode error. In the game, it looked just like the original
sphere. Go figure.
I don't use spheres personally in my levels; I just
don't like the brush count that results from them, but as you can see,
they are easy to make.
Cylinders
Cylinders are as easy to make as spheres and don't
seem to have quite as many problems associated with them. You can use
cylinders to make pipes, like wind tunnels, or sewer pipes, or to cut
out holes in walls for stained-glass windows. I used one to make a
water well in a level I was working on. It made the job
a little easier than trying to clip and carve a brush on my own.
As in Spheres, brush size in the X and Y axis
doesn't matter; it just controls the location of your cylinder. The
brush size in the z-axis controls how long your cylinder will be. To
make a cylinder, make a brush and set the z-axis to the length you
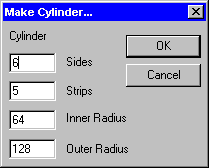
want your cylinder to be. Click on the Cylinder button and you'll see
this box:

The inner and outer radius work the same as in the
Sphere tool. The Sides setting controls how smooth your cylinder will
be. Again, the higher your number of sides, the more drag you'll put
on the game's engine, so use this cautiously. I'm not really sure why
the Strips setting is available. If you just want a long cylinder, set
this to 1. Any other number and your cylinder gets divided up into
strips (the overall length doesn't change) which really just
translates into more brushes. I guess if you wanted to offset portions
of your cylinder so that it wasn't perfectly straight, this would be
the way to go, but I haven't ever used it.
For this example, set the inner radius to 48 and
the outer radius to 64. I set the number of sides to 8 and the number
of strips to 1. Click on OK to create your cylinder. Now, if you drag
this cylinder up against the ceiling, you can see it would make a good
wind tunnel, similar to the one we made a while back. Of course you
can use the rotation buttons to rotate this cylinder along a different
axis if you wanted your pipe coming out of the wall instead. It's
really up to you.
N-Sided Polygons and Pyramids
I've combined these two, since they are
virtually identical in use. The only difference is that a pyramid
comes to a point at the top and the N-sided polygon is squared-off at the
top. Also, the pyramid height is set by dialog box and the N-Sided
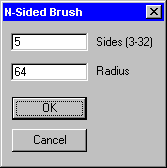
polygon takes its height from the height of the brush. X and Y
dimensions don't matter; they are controlled by the dialog box.
Create a brush in the position you want your new
polygon to be and click on either the N-Sided or the Pyramid button.
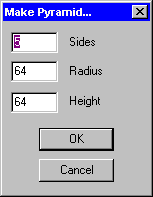
You'll see either of the two following boxes appear:


As you can see, they are the same, except for the
height setting in the pyramid box. Let's make a pyramid, so with your
new brush selected, click on the Pyramid button. Enter 4 for number of
sides (the bottom is not counted as a side) and leave the other two
settings at 64. Click OK to create your pyramid. It's that easy.
Wedges
Basically, making a wedge is the same as making a
brush and clipping it diagonally from corner to corner. I prefer the
clipping method myself, but if you want to use the wedge tool, simply
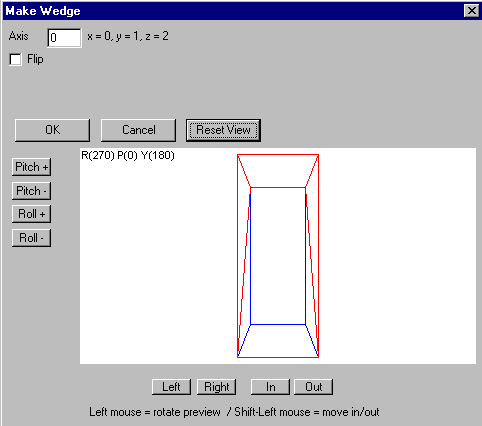
make a brush and click on the wedge button. You'll see the following
dialog:

The 'axis' box controls which axis the clipping of
the brush will occur on. The flip box does the same thing as the 'flip
clip plane' button you can use when clipping. You can move the view
around to see a preview of your wedge before you actually create it,
similar to how you can preview an arch. That's basically all there is
to it. Like I said earlier, it's like clipping a brush diagonally, but
this tool is available if you want.
One additional thing to keep in mind, when you're
making brushes in Quake maps. If you make a brush that has more than
16 sides you'll need QBSP256 in order to compile it. QBSP as
originally written only allowed 16 sides per brush. QBSP256 should be
available
here.
Also, if you get a shape you really like, like an
arch for instance, you might want to use it over again in another map.
BSP makes it easy for you to create a library of prefab objects. Just
select all the brushes that make up your arch and select "Save
Brushes" under the Brush Submenu in the File Menu. This will save
your arch to a *.bru file which you can then load into another map if
you want. You can have as many of these *.bru files as you want if you
make shapes you want to use again and again. It's really a useful
feature. The only problem is that any entity information on a given
brush (like lights for example) is lost when you save it to a brush
file. The brush is still there, it's just not an entity anymore. If you want
to save save the entity information with the brushes you export, it's easy. Rather than selecting Brushes
from the File Menu, select Objects. This menu allows you to Merge
Entities and Brushes In and Out to disk, retaining their entity
information. Other than that, the two options are identical.
Well, that's about all I can tell you about BSP's
object library. Hope you've found this lesson useful. I know it was
kind of long compared to the last few lessons, but there was a lot of
information to cover.
This site is designed for 800x600 resolution, and is best
viewed in Netscape 4.0 or above with 16bit color or higher.
BSP is the sole creation of
Yahn Bernier. I am only a
dedicated user, reporting news and making tutorials so Yahn can spend more
time enhancing BSP.
This web page was created and is being
maintained by me (DeadMeat). Unless otherwise noted, all content appearing on this site
was written by me. Also, 'DeadMeat's BSP Tutorials' were created entirely by me. All unauthorized use is
prohibited. (c) 1997. So there :-P
