"Brushes" are the building blocks of maps. They are non-concave objects
defined by four or more intersecting planes. Each plane is defined by three
vertices (a 3D triangle). Where these different planes intersect, edges of the
brush are created and this is what is seen in the 3D world. Planes are important
to understand because they define the behavior of brushes when they are
manipulated.
Default Keys
` (backtick/tilde key) - select all
Escape - deselect all
- (numpad minus) - delete selection
Ctrl+space - clone selection
Rotation and mirroring
The left three buttons mirror brushes along an axis, the middle three rotate
brushes 45 degrees at a time, and the last set of buttons choose the manual
rotation step size.
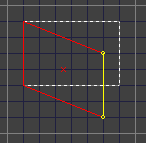
To manually rotate a selected brush, hold Ctrl and drag one of its vertices.
Caution! The Quake 1 and Quake 2 engines have a limitation in their 3D formats
that do not allow plane points to have decimal values. This means that freely
rotating a brush will eventually cause it to unalign from the grid, as the points will
snap to the nearest whole number.
Shearing
Shearing can transform a rectangle shape into a parallelogram in one step. A
brush face can be sheared by holding Ctrl+Shift and dragging.
Clippers
Clippers are a useful tool used for carving and splitting brushes. They are helpful
for carving corners off of brushes, creating triangle shapes, or for making organic
objects such as rocks or terrain.
Carve - slices a brush in half and removes one part.
Slice - slices a brush in half and leaves both sides remaining.
Flip - reverses the side that will be removed by a carve operation.
Default shortcut to create a clipper point is Shift+right click. All clip points can be
moved at once while holding Alt and right-dragging. To hide the clippers, press
Escape.
The clippers stay visible feature will leave clippers visible after a carve or split
operation. This can be used to save time when creating the rounded top of arch
for example.
The create from current face command takes the plane for the selected face
and turns it into three clip points.
See the Clippers
section for more information.
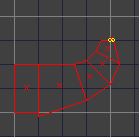
Face extruding
Extruding a face will create a new brush from the current face of the selected
brush. The following object was created by extruding faces from leftmost brush
and manipulating the vertices of the extruded brushes, finally ending at the
selected tip.
Notice that not all vertices line up exactly to the grid. This can cause problems
down the line when trying to align brushes. See the following section on snapping for a solution to this.
Snapping
BSP has a few different options available for point snapping. To snap an object
to the grid, select it and use Snap to Grid or Snap Planes. These two snapping
options exist because they behave differently, and sometimes one is better to
use over the other.
Snap to Grid - this feature aligns axial or close-to-axial edges to the grid. It is
good for fixing small alignment issues or slightly deformed brushes. It didn't help
so well in this case.
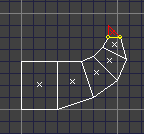
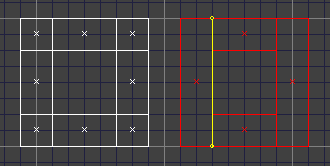
Snap Planes - this feature goes through each plane for a brush, and snaps the
three plane points to the grid. In the picture below, all of the edges have now
been exactly snapped to the grid, although some of the organic shape has been
lost.
Snapping and grid size...
The current size of the grid will be used to determine where to snap points to, so
if you have the grid set really large and you snap an object, it may completely
destroy it! A good practice is to snap brushes with faces and edges that are
larger than the current grid size.
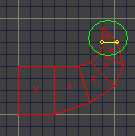
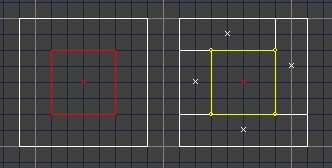
To illustrate differences in the two snapping methods, and to show how grid size
effects snapping, here are two more examples.
Snap to Grid with a larger grid size. The top brush became 2 units tall.
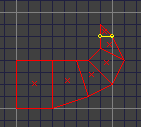
Snap Planes with a larger grid. The top brush was completely lost, and the brush
below it became infinitely tall!
Snap Back option - When this feature is enabled, dragged vertices that are not
aligned to the grid will be "snapped back" to the grid when they are dragged.
edge_use_grid option - snap edges to grid (eg, dragging corner of a cube)
vertex_use_grid option - snap vertices to grid (eg, dragging tip of a pyramid)
Setting the grid size to 1 will effectively disable snapping.
CSG Subtract and Merge
Subtract - the selected brush will remove any portion of other brushes that touch
it. This can be helpful for putting doors or windows in a large wall, for example,
but keep in mind that it will likely make less-optimal geometry than if the door or
window were to be created by hand.
Merge - merge brushes together. This feature can reduce brush count by finding
touching and similar brushes and combining them into one.
Hit Brushes
If a number of brushes are overlapping and it is difficult to select one, hit brush
cycling can be used to select the desired brush. Click somewhere inside the
bounds of the brush you want to select, and then use Previous hit or Next hit
until it selects the brush. Select all hit can be used to select all brush that could
be selected by clicking at a certain point.
The default keyboard shortcuts are Ctrl+home and Ctrl+end for previous and
next hits, or under the menu Brush->Hit.